How to make a Seitan Turkey with a crispy skin that is full of stuffing! This vegan turkey is the perfect alternative for the holidays that will help you keep your traditions- no matter your values!
This seitan turkey is an updated recipe from lasts years Seitan Turkey– the main difference here is this recipe makes it possible to stuff your vegan turkey. And the way that it’s done adds even more flavor to the overall seitan.
The texture is meaty, delicious, juicy, and will be the star of your holiday spread. You will never go back to a premade vegan holiday roast after trying this!


How to Make a Vegan Turkey From Bread Flour
Here is a quick overview of what to expect when making this vegan turkey. This recipe has you wash the flour, a process where you make a dough ball using bread flour, and then you knead the dough under water to remove the starch. This leaves you with pure gluten, or wheats protein.
From there you will season the gluten and wrap it around an apple. You will wrap the gluten around the apple, then wrap rice paper around the gluten, and do another layer of gluten over it.
Then stuff it inside of a stock sock and simmer it until nice and firm. Let it rest in the fridge overnight or until you are ready to roast it.
The day you are ready to serve your seitan turkey you will cut out the apple and then stuff it with your favorite stuffing. Then you season your exterior with a bast and roast it in the oven.

Why Seitan from Washed Bread Flour is Better Than Seitan Made from Vital Wheat Gluten
The reason why I recommend this method over using Vital Wheat Gluten is because you will have better flavor, better texture, and overall the end result is far superior using this method.
It is very easy to have a rubbery tough texture that is almost squeaky with vital wheat gluten, it also has a distinctive smell and flavor.
The process of creating vital wheat gluten in manufacturing causes the amnio acids to go rancid, which creates that off smell and taste. Sure, some chefs are able to mask that flavor.
But do you want to? Do you want to consume food that has rancid oils in the wheat germ and the amnio acids?
Bread flour on the other hand is easy to obtain fresh and consistently offers a neutral flavor that is perfect for seitan. The texture is another game changer when it comes to making seitan this method- you get lovely shreds that are very meat like.
How to Wash the Flour
I have multiple videos on how to wash the flour on Tiktock, the playlist “don’t mess up your Seitan” is one I recommend for beginners.
First make sure that you have really kneaded your dough so it is strong and elastic. If this is your first time making seitan from flour try to stick to a high protein bread flour. While you can make seitan from all purpose flour, I advise against it until you have successfully made it with bread flour first as it is more challenging to work with. The same applies to whole wheat flour.
Some grocery stores will sell very strong bread flour in addition to regular bread flour- the main difference between the two is the very strong bread flour will have a higher protein ration. This is ideal for seitan because we are extracting that pure wheat protein.
Now that you have worked your dough you have the option to let it soak in salt water overnight. I like to include this option because it helps ensure that your dough has had the time to develop the gluten. You cannot over work or over knead your dough, but it is a common mistake I see where the dough has not had enough time to develop or it wasn’t kneaded enough.
When you are ready to wash the flour, or remove the starch from the gluten in your dough, you will want two large bowls. One bowl to save your wheat starch, another to wash your dough in. This is a messy process so wear an apron.
Cover your dough ball in cold water and gently knead it. You can use your hand to squeeze the dough and you will see starch will seep out. You are going to do this until the dough becomes webby, and the water will become thick with starch. If the dough starts to fall apart use your hands to squish it back together.
If it is unmanageable (likely from you not kneading it enough or letting it rest long enough before washing it! Or you aren’t using a bread flour), cover the dough in salt.
Be generous with your salt, up to a 1/3 cup of salt and let it rest in the fridge.
The salt and the cold helps strengthen your gluten so it is easier to handle. Don’t worry about your end result tasting salty, it will wash off!
If you use salt while washing the flour it will go faster but your wheat starch will retain that saltiness. Which isn’t ideal if you are saving that wheat starch for pancakes, so that is something to keep in mind.
Wash the gluten until there are no smooth bits in the dough, those smooth bits are pockets of starch. If you leave too much starch in your gluten your result will be tender, and even doughy.
A good rule of thumb is to wash it until when you dip it in water, no more starch comes out. Another way to check is after you wash the gluten, let it rest in a bowl. Water will separate from the gluten and if it wasn’t washed enough you will notice starch will also leak from the gluten. If that’s the cause, give it another rinse!
Washing the flour can take as little as 10 minutes to do or up to 40 minutes, it really depends on your flour, water temperature, how long you kneaded it or let it rest, and your technique.
It is common issue to under wash your gluten, but rare that you will over wash it.

Shaping your Stuffable Seitan Turkey
Look at my video on how to shape the seitan. But essentially you are wrapping half the gluten around an apple while coating it in the flavorful sauce, wrapping it in rice paper, then wrapping the over half of the gluten around all of that.
The apple is there to create a cavity for the vegan turkey so you can stuff it. It also doubles as another way to flavor your seitan.

This is what gives your seitan turkey a crispy skin while keeping the center nice and moist. The rice paper dissolves in with the butter and creates a ‘fat like’ layer which is very similar to an actual roasted turkey skin.
Using a stock sock helps keep the seitan’s shape and it also helps create the exterior texture for the skin. After it simmers the skin can be delicate, so be gentle while handling it.

The next day you will cut out the apple and then stuff your seitan turkey with your favorite stuffing.
You will also create a baste for your turkey and roast it in the oven. Then it’s ready to serve!
Looking for other Vegan Meats you can use as a center piece?
- Seitan Turkey is a simpler version of this recipe where you don’t create a cavity for it so you can stuff it, instead it’s a solid mass of delicious turkey flavored protein.
- Looking for a beefy centerpiece? This seitan Roast Beef is the perfect main to go with roasted vegetables, gravy, and other hearty sides.
Want a classic vegan roasted chicken? This is how to make a delicious vegan chicken that is perfect for any occasion.
Stuffed Seitan Turkey
Equipment
- 1 Stock Pot
Ingredients
Seitan Base
- 5 lbs Bread Flour Extra Strong/ High protein
- 7 cups Water
Flavor Sauce
- ½ cup Vegan Butter any plant-based butter works here
- 1 tbs Nutritional Yeast Flakes
- 1 cube Vegan Chicken Bullion
- 1 tsp Garlic Powder
- 1 tsp Onion Powder
- 1 tsp Smoked Salt or Truffle Salt
- 1 tsp MSG optional but delicious
- 1 tsp Mushroom Seasoning sub with more vegan chicken bullion
- 2 sheets Rice Paper
Vegan Chicken Broth
- 10 Cups Vegan Chicken Broth You can use the recipe to make your own here Or you can use a premade one
Basting
- 1/3 Cup Vegan Butter
- 1 tbs Garlic Powder
- 1 tbs Onion Powder
- 1 tsp Sage
- 1 tsp Rosemary
- 1 tsp Thyme
- 1 tsp Truffle Salt or Mushroom Seasoning
- ½ tsp Black Pepper
- ½ tsp Aleppo Pepper
Fillings
- 2 Cups Stuffing Any stuffing you prefer
Instructions
Make the dough and work it!
- Mix together the flour and water to create a dough ball. Let it rest 10 minutes then knead it. You can use a stand mixer here. You can do some stretches and folds every 20 minutes for up to 2 hours, or you can use a stand mixer on medium high for about 10 to 15 minutes then letting it rest for 1 hour. Alternatively, you can make this recipe No Knead by covering the dough in salt water overnight and proceed with the next step the following day. You want to work the dough or let it rest long enough to get it to form gluten. You cannot over knead your dough. Ensure you either let it rest overnight in salt water or knead it very thoroughly and let it rest.
Wash the Flour (see article above for more tips and tricks)
- Cover your dough ball in cold water and gently knead it. You can use your hand to squeeze the dough and you will see starch will seep out. You are going to do this until the dough becomes webby, and the water will become thick with starch. If the dough starts to fall apart use your hands to squish it back together. Change out the water when it is very thick with starch water and work the dough until when you run water over it, it rinses clear. Ensure there are no smooth pockets of dough, that means there is still wheat starch in the gluten. When the dough is webby and there is no pockets of starch and it runs clear under water let it rest in a bowl for at least 20 minutes. (You can let this rest overnight or for multiple days if you want to marinate the gluten in vegan chicken bullion or smoked salt) If starch is leaking from your gluten, rinse it and wash it more. You want clear liquid to come from the gluten.
Shape Your Seitan
- At 12 cups of vegan chicken flavored broth to a stock pot and bring to a low heat.
- Create your flavor sauce by combining your vegan butter with all the spices and seasonings.
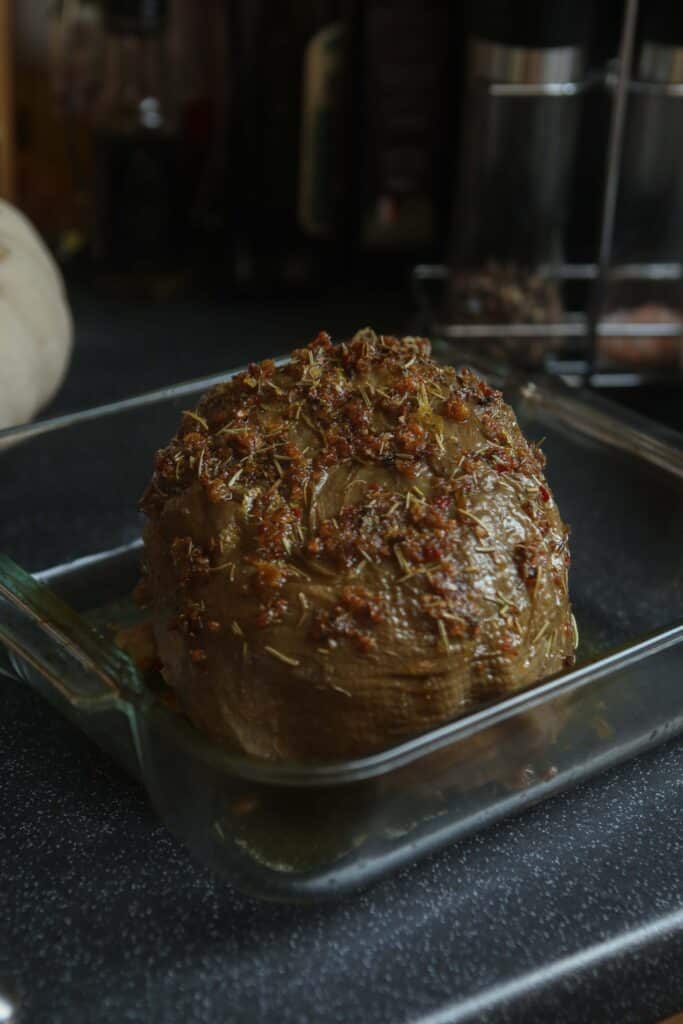
- Divide your gluten in half. Take one of the halves and divide out into 6 sections. Set the other half to the side. Rub a little bit of your flavor sauce over each of the 6 mini sections.Take a medium sized apple and remove the steam. Rub the seasoned butter over the apple. Wrap the buttered gluten around the apple. Now tip your rice paper into water to soften them. Coat them in the seasoned butter and wrap it around the gluten. Take the other half of the gluten and flatten it out. Coat one side of it in the remaining seasoned butter. Wrap it around the seitan, to fully encase it. Place that inside of a stock sock and tie it.
- Place the gluten into your prepared broth and let cook on low. DO NOT LET IT BOIL!!! You want a low heat and to slow cook it, too high of a temperature will create air bubbles- causing a spongy texture. For best results, put in a slow cooker and cook on low. Let the seitan simmer on low for 4 hours or until it reaches an internal temperature of at least 165FRemove from broth and refrigerate overnight
Roast Your Vegan Turkey
- Preheat oven to 350F
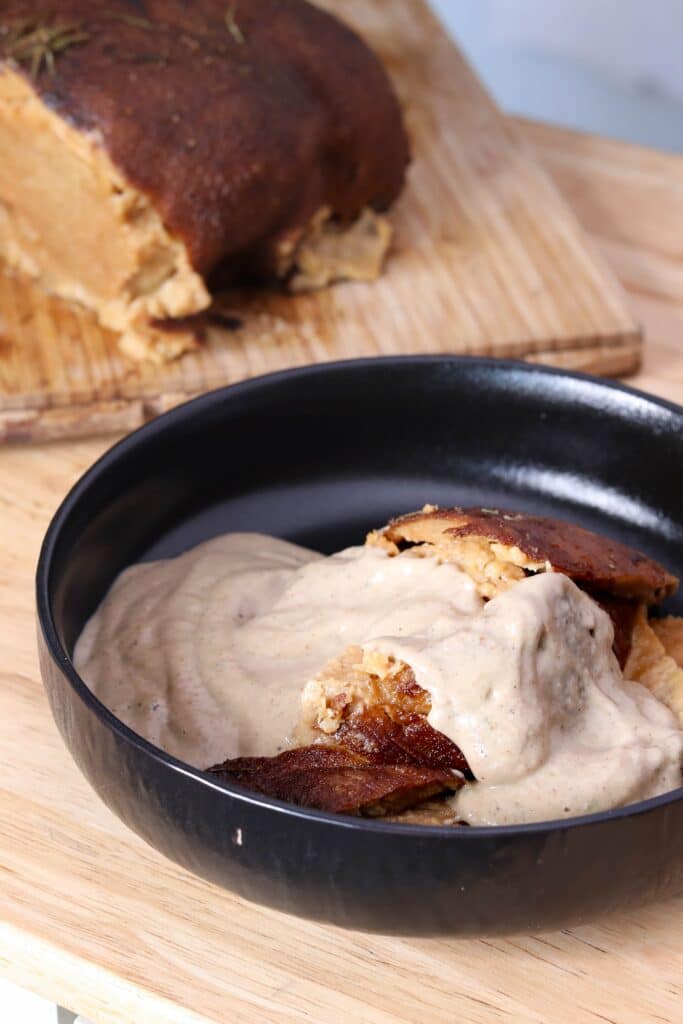
- Remove seitan from stock sock and cut a hole at one end of the seitan. Remove the apple from the center. Fill the cavity of the seitan with your stuffing.
- Create your bast by melting your butter and mixing in all the spices and herbs. Coat your seitan in it
- Bake in the oven for 45 minutes, basting it halfway through using a brush or spoon
- Serve with your favorite gravy
Video
Want inspiration for other Holiday Sides to Serve with this?
- Miso Mushroom Gravy is a savory and an ultra flavorful way to enhance your vegan turkey!
- Filling your seitan turkey with this vegan wild rice stuffing! It’s chewy, moist, and packed with flavor!
- Crispy potatoes are a must for a holiday side and pair so well with vegan turkey!
- Oven roasted butternut squash is a healthy yet delicious side dish for the colder weather!
- Another healthy vegetable side that is quick and easy to make is Air Fried Brussels Sprouts
It looks terrific. I have already washed the flour and am now preparing the stuffing. I hope I will be successful in recreating your piece of art!
I made this recipe a few times now – the texture is really great and the flaver as well! I couldn‘t believe how well the cavity for the stuffing worked. Thank you for the recipe!