Save money by making your plant-based protein at home that tastes and feels just like chicken!
On Tiktok I showed off how to make a seitan chicken from flour and water – and it blew up to over 3 million plays! Here is how I made it, in detail, so you can replicate it too.
This is a staple recipe in my home- it is easier on your stomach compared to vital wheat gluten and it has an incredible flavor!
This is what I use as a base for ‘copy cat’ Gardein Ultimate Tenders, and it’s also incredible in tacos, in soups, and perfect in sandwiches.

Below I have in-depth tricks and tips for success. I recommend giving it a read if this is your first time making flour washed seitan to ensure you’ll have a great result.
Seitan from Flour
You wouldn’t normally think about bread flour being a protein source. However, the bag of bread flour I used has 315 grams of protein!
What makes up flour is gluten and starch- or protein and sugar. Bread flour is higher in protein compared to pastry flour because the proteins form gluten, which helps create a structure to trap air. This helps your bread have a better rise. Fluffy and crusty sourdough is mainly made with bread flour.
When you knead dough under the water, the starch from the dough gets separated from the gluten. You’ll be left with a bowl of starch water and another bowl of pure gluten protein.
This recipe makes 3lbs and 3 ounces of seitan out of the 5 pound bag of flour, which gives you about 6.18 grams of protein per ounce.
Bread Flour vs Vital Wheat Gluten
Most seitan recipes you’ll find use vital wheat gluten. Vital wheat gluten is a great shortcut for making seitan. It makes it so you don’t have to ‘wash the flour’ or do the process of separating the starch from the protein. However it can be more difficult to digest for some, and it has an unpleasant but hard-to-desribe flavor.
For a better flavor and a cheaper price, try washing the flour and make your seitan from bread flour!
The brand of bread flour doesn’t matter.
Choose a high protein flour for a larger yield. You can make this with all-purpose flour, however you will have a smaller yield.
If you use all purpose flour you will have more starch to wash out and a smaller ball of gluten. (Less protein means less gluten and more starch.) If all purpose flour is what you have access to, give it a try!
Chicken Seitan Schedule
Be mindful of that this recipe is a slow and beautiful process. It is mostly hands off time- very similar to sourdough baking.
This recipe has the best results if you take 3 days to make it.
You can make it in two days for a good result- but you’ll have the most satisfying texture if you let the seitan rest for an additional day.
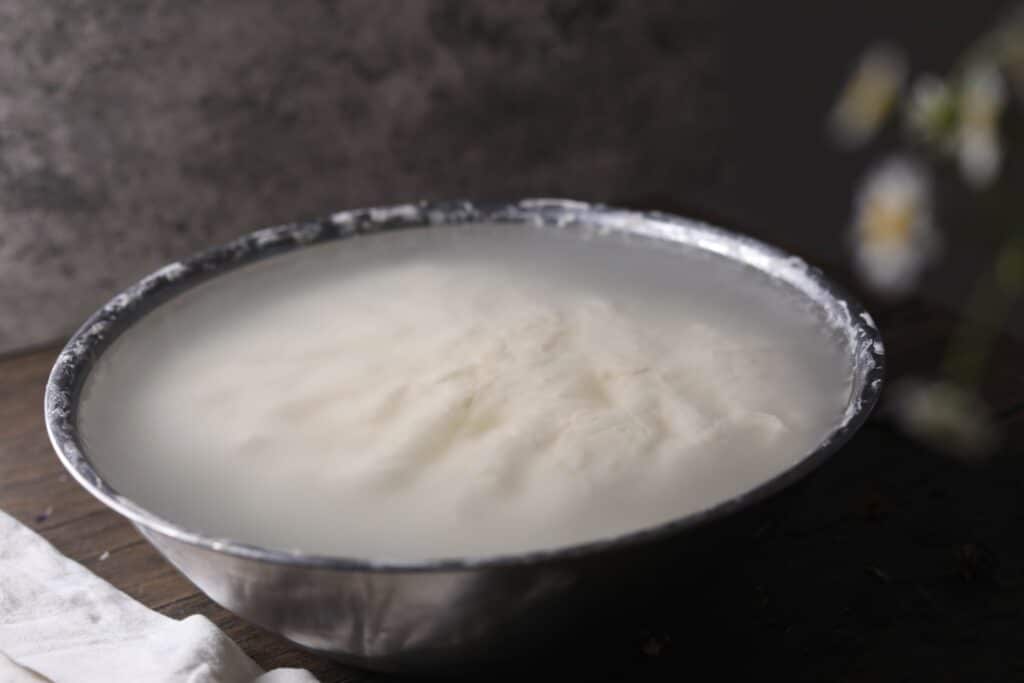
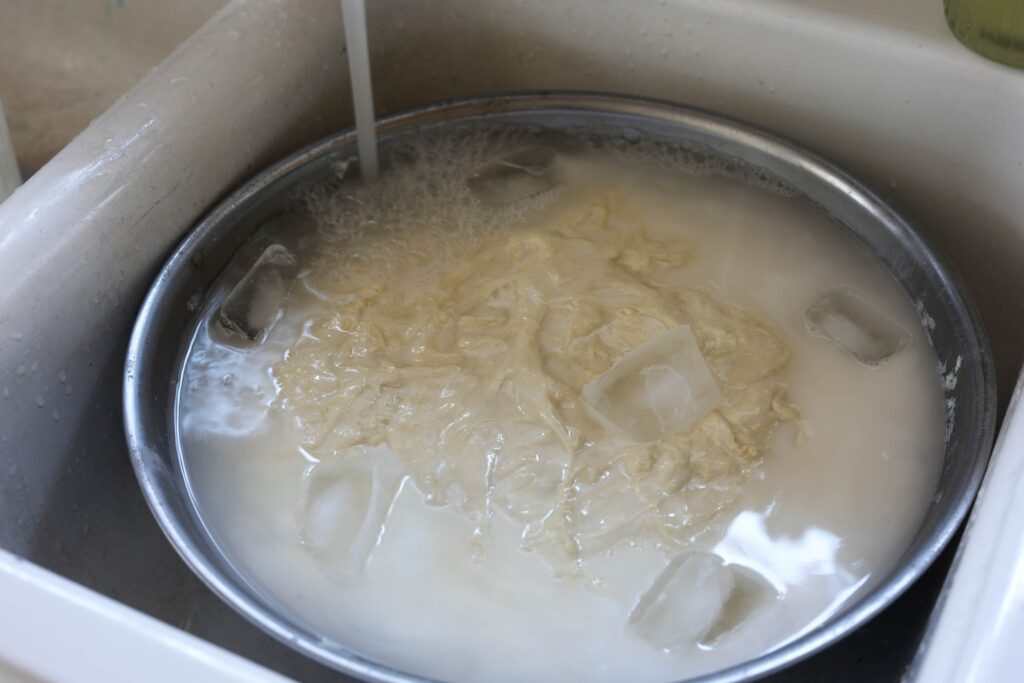
Day 1: Mix together the flour and water into a dough. Cover (submerge) in salt water overnight.
Day 2: Wash the ball of dough, season, and shape the seitan. Pan fry it, then simmer it overnight in broth.
Day 3: Remove from the broth and let chill in the refrigerator.


Create the Dough Ball
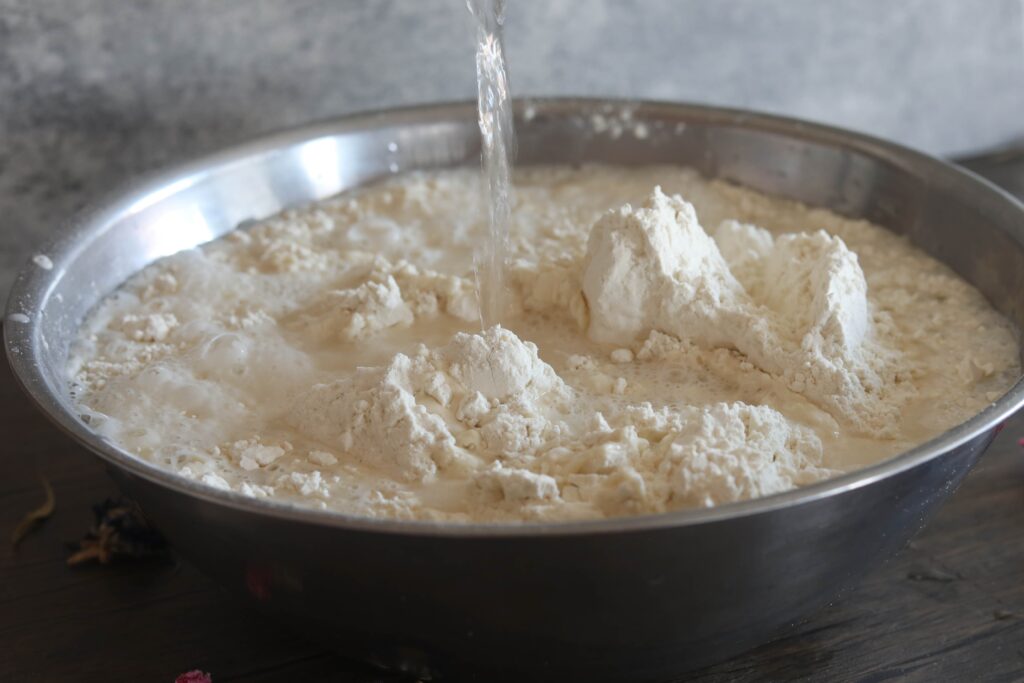
In a large bowl add your bread flour to water to form a dough. This is about 6 cups of water, to a 5 lbs bag of flour. The exact amount of water doesn’t matter too much as long as you are able to make a solid ball of dough that you can knead.
Let it rest for an hour to autolyze (allow the gluten to start to form).
You can either knead the dough, or you can stretch and fold the dough (think bread making) to help develop the gluten. Knead it or stretch and fold the dough until it is smooth and elastic. (See the video to see an example of ready dough).
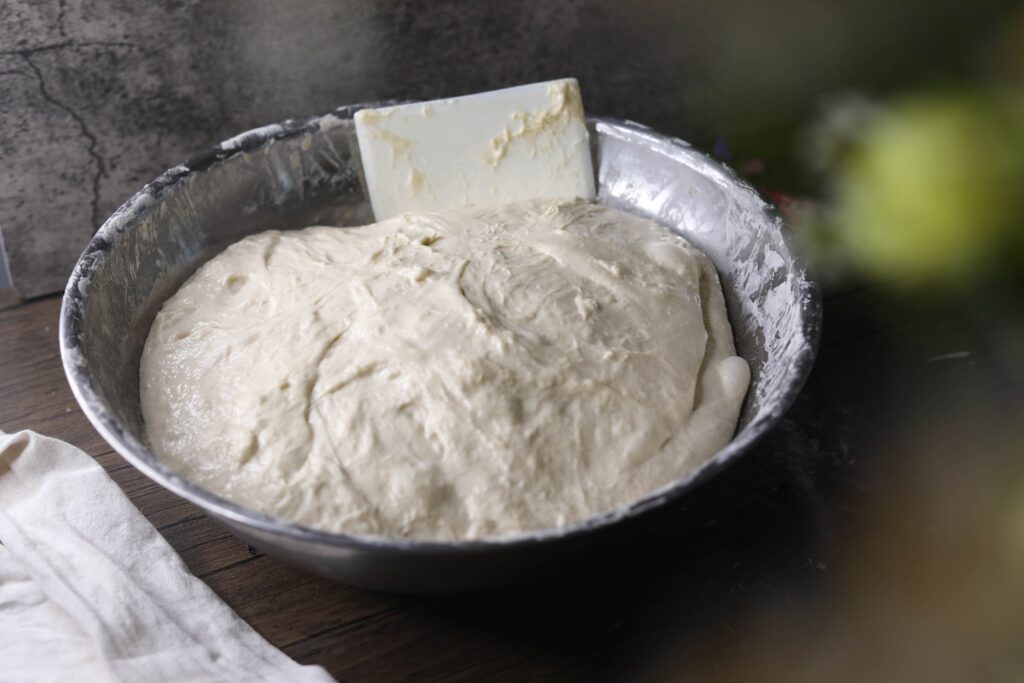
After you’ve kneaded your dough and it is nice and smooth it’s time to cover it in salted water. Use anywhere from 2-6 tablespoons of salt to dissolve in your water. That sounds like a lot of salt- but it will be washed away and you will not actually ingest it. It is there to help strengthen the gluten in the dough.
The salt is helpful in this stage because
1. Salt enhances the hydration of gluten proteins, which makes them more elastic and cohesive
2. Salt reduces the free sulfhydryl groups (SH) in gluten proteins, which are responsible for breaking and reforming disulfide bonds (S-S) that link different protein chains together. This means that salt stabilizes the gluten network and prevents it from breaking down easily.
3. Salt increases the beta-sheet structure of gluten proteins, which is a type of secondary structure that gives them strength and rigidity
4. Salt promotes the macromolecular aggregation of gluten proteins, which means that they form larger complexes with each other.
In another words, salt helps make the gluten stronger. This helps you have a higher yield since less gluten will be broken down when washing.
Often when people are washing the flour, the ball of dough falls apart. This can be a result of not kneading your dough enough, not letting it rest enough, or not using salt when letting it rest.
Another helpful tip is to use fermentation weights, or something to weigh down the ball of dough (it can float!).
Wash the Flour
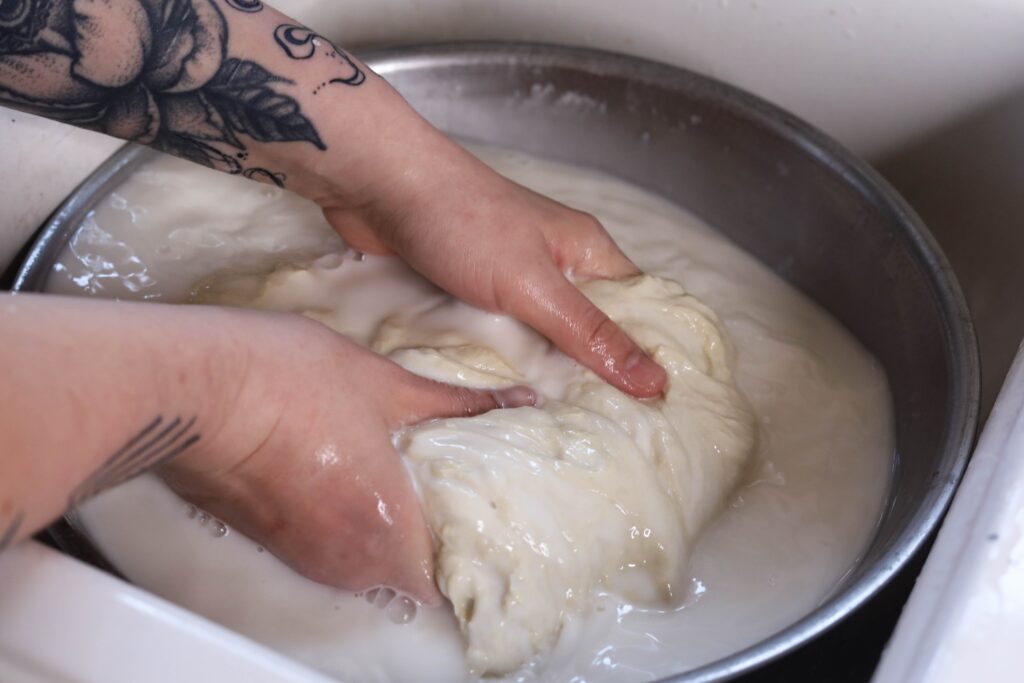
The next day pour off the water from the ball of dough. Grab a second large bowl and a strainer to help collect the wheat starch. It’s helpful to have a few large jars to save your wheat starch too.
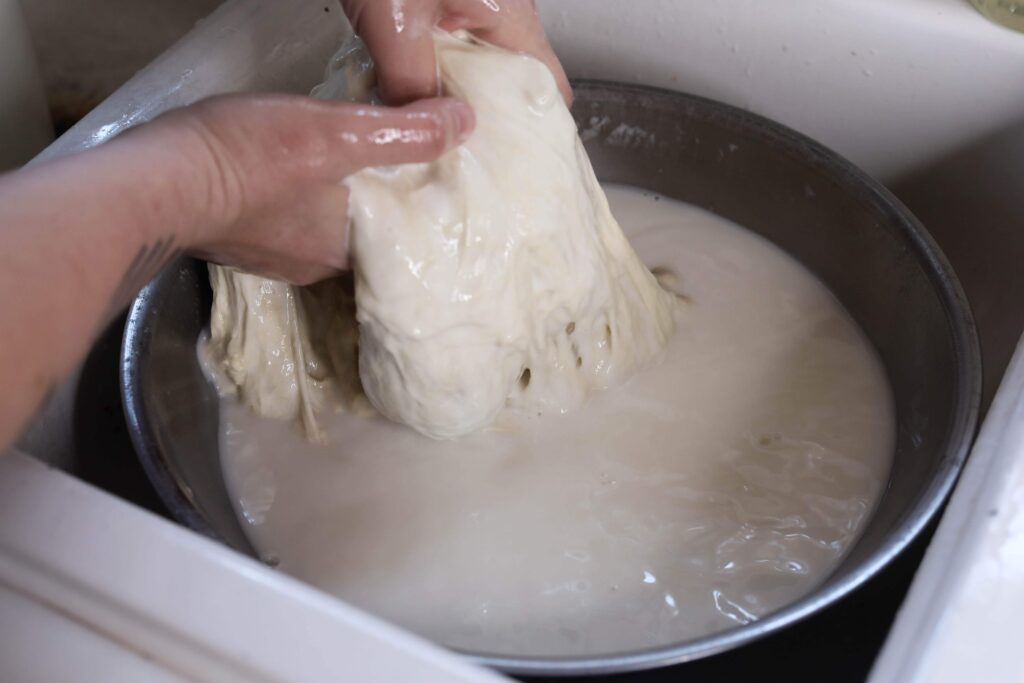
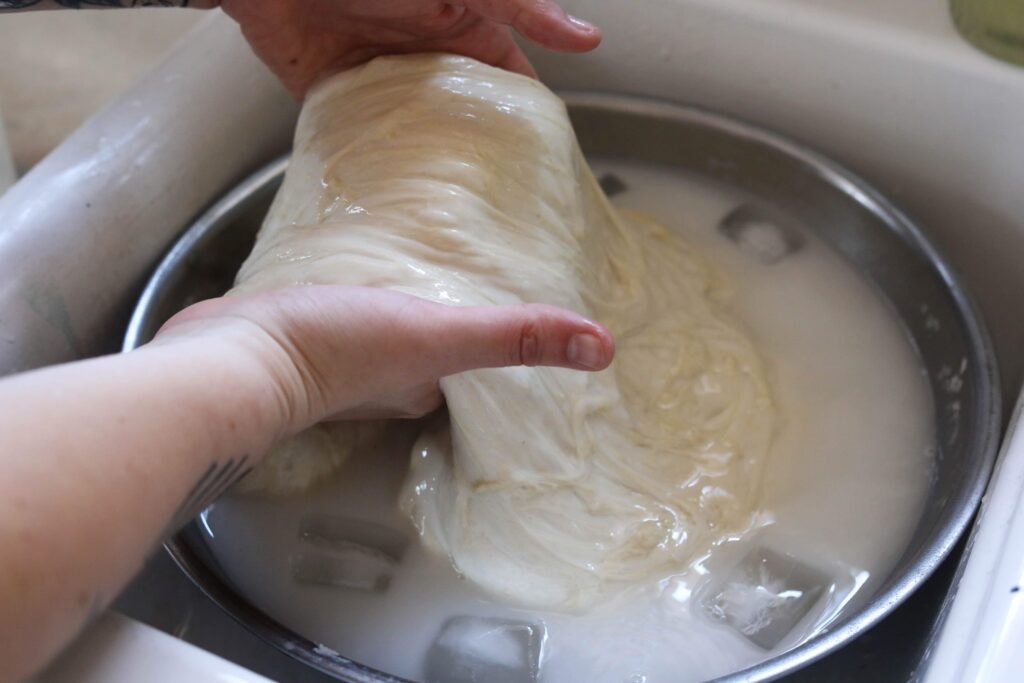
Pour cold water over the ball of dough and begin to knead it, be gentle to not tear the gluten. Cold water helps the gluten seize up and helps keep the ball of dough stay together.
Continue kneading until the water becomes very thick and milky. Pour away the starchy water into your glass jars to save for another recipe. Use a strainer to help prevent gluten from entering the starch water.
Repeat the process of kneading the ball of dough and straining the starchy water about 6 times.
At the 4th or 5th wash the seitan can be pretty loose. Remember to use cold water and to be gentle- it will come back together as the starch washes out.
Don’t save the starch after the 5th wash because it tends to be very watered down and isn’t worth the extra time.
Continue to wash it until there is little to no starch left (the water remains mostly clear).
Vegan Chicken Seasoning
At this point stretch out your seitan and sprinkle over your seasonings. Knead it into the dough. The dough is very elastic and difficult to work with. It’s ok if not all of the seasonings get incorporated into the dough.
Later, we simmer the seitan. When it simmers it will expand and absorb the broth it is cooking in. The broth will be the majority of flavoring your seitan. Many recipes don’t have you season your seitan at all because the broth will flavor it.
So if your seasonings don’t penetrate the dough- it’s no big deal! I’ve found gently rubbing it in can be helpful but there is still some seasonings that don’t get penetrated.
I encourage you to try out the smoked yeast. It adds a fantastic flavor to this seitan that is very chicken like. Especially paired with mushroom seasoning, garlic, onion, and poultry seasoning.
This recipe has you make a chicken seitan- that being said, you can flavor this any way you would like!
Instead of using the seasoning blend in the recipe, you can use a vegetarian chicken bouillon to flavor it.
At this point let the dough rest for about an hour to help it firm up.
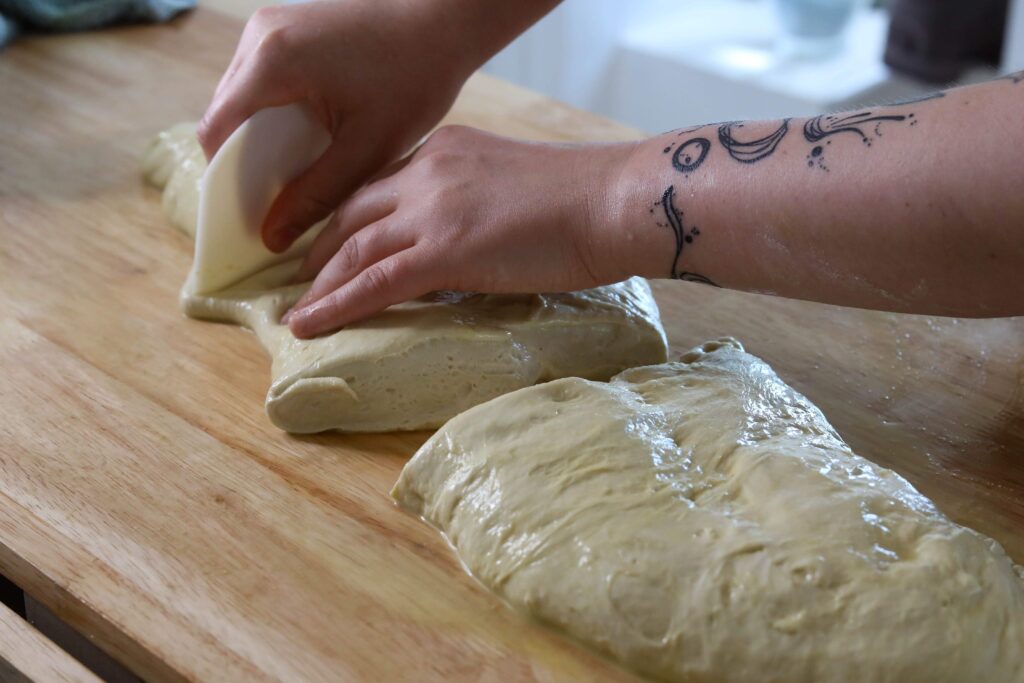
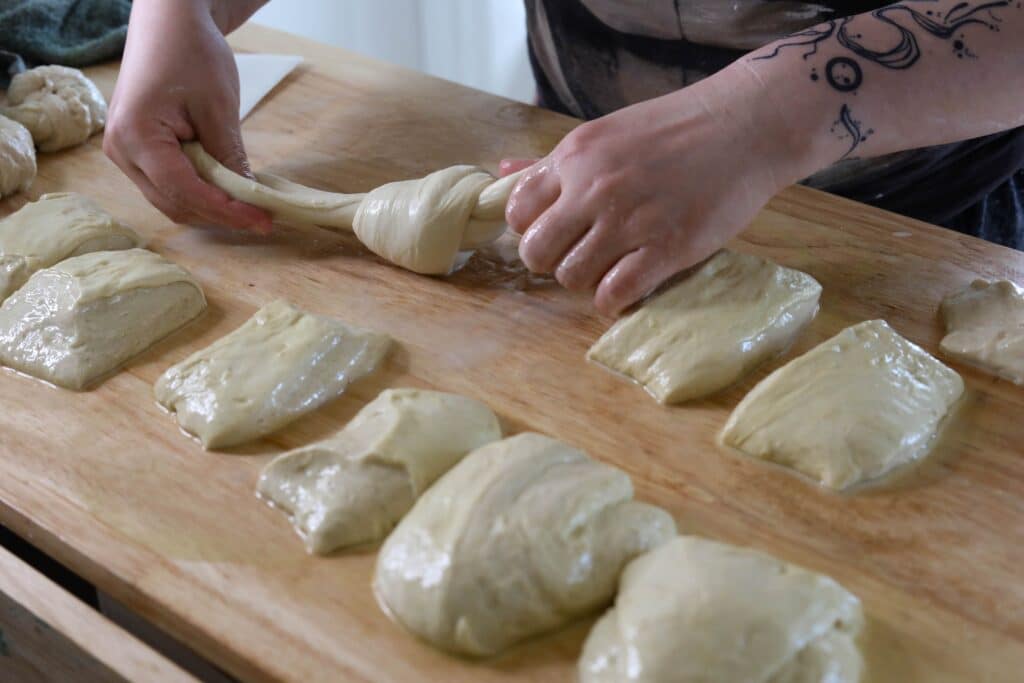
Shaping the Seitan
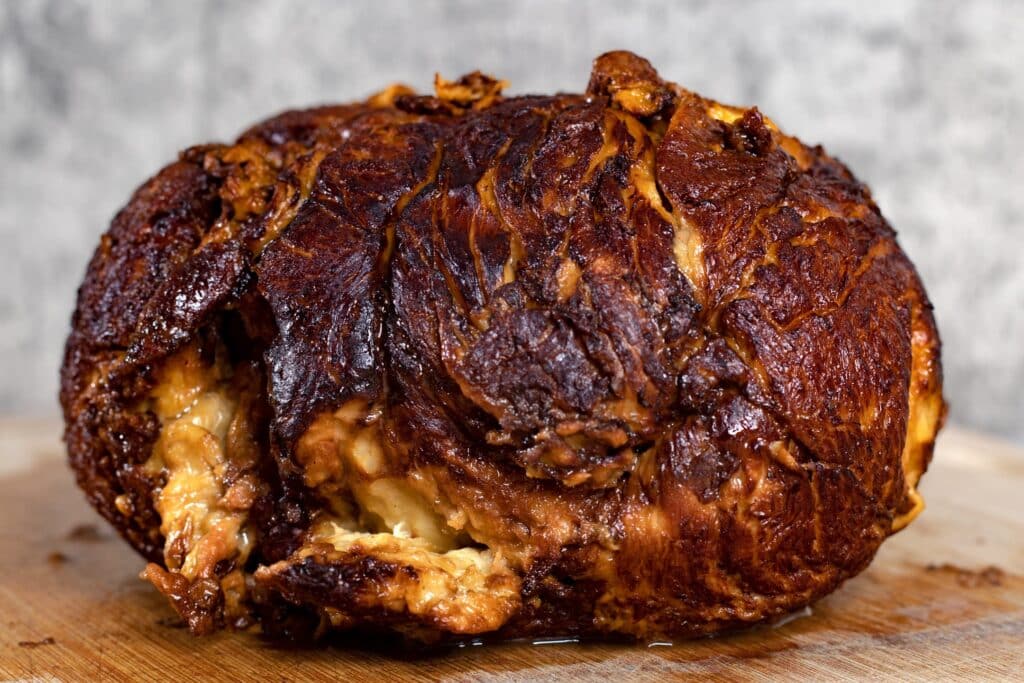
You have the option to make one giant seitan loaf or you can break it up into smaller chunks. Both are great, it all depends on if you want a large seitan the size of a rotisserie chicken or smaller chunks the size of chicken breasts.
The more folds, knots, and layers in your seitan- the better. This is especially true if you are looking for a shreddy chicken like seitan.
If you were to cook the gluten in a ball like it is, the texture would be more like meatloaf. Or something that resembles the inside of chicken nuggets- where it is a bit spongy.
That is why you’ll want to stretch out your gluten into a long rope, twist it tightly, and create tight knots. The tight, twisted knots help the gluten create long strands.
These long strands give your seitan a shreddy texture with a better mouthfeel.
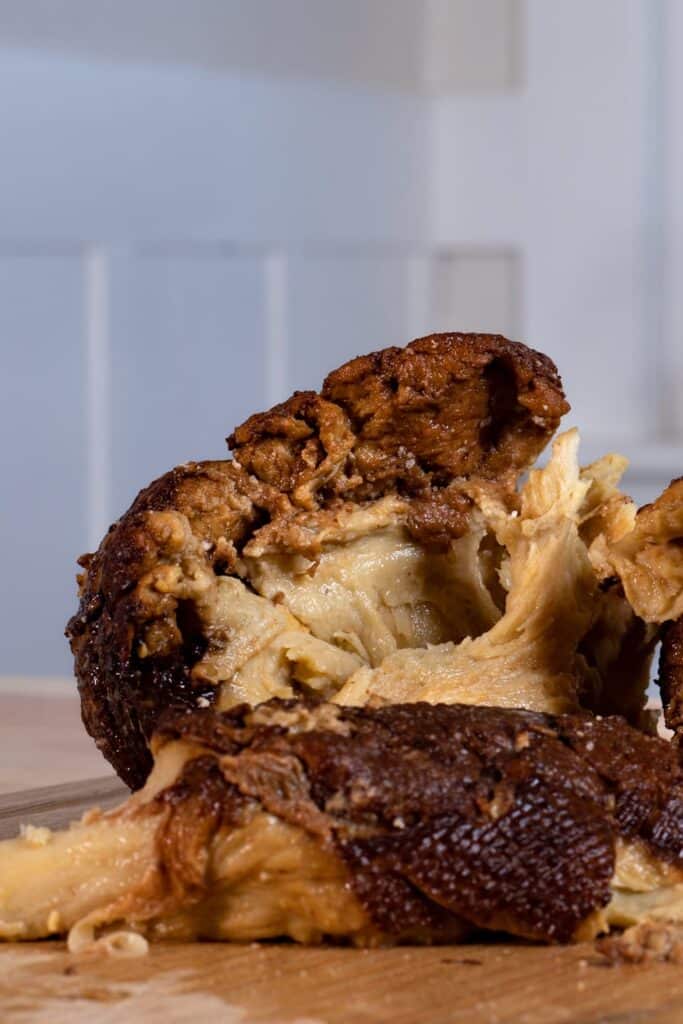
Frying the Seitan
At this point you will need to fry your seitan knots. As gluten cooks in broth it expands, absorbing the broth. If it expands too much your seitan will have little bubble- creating a spongy texture. The tight knots you did in the last steps will help with the texture, but more measures need to be taken.
Frying the exterior of the seitan helps create a seal- a skin if you will, that helps it from expanding too much.
Bring a frying pan to a high heat and add 1/4 cup of coconut oil. Add the knotted seitan and fry the exterior. Be careful flipping it since it’s a decent sized loaf. I use two spatulas to flip it carefully. Fry it until it has a golden-brown exterior.
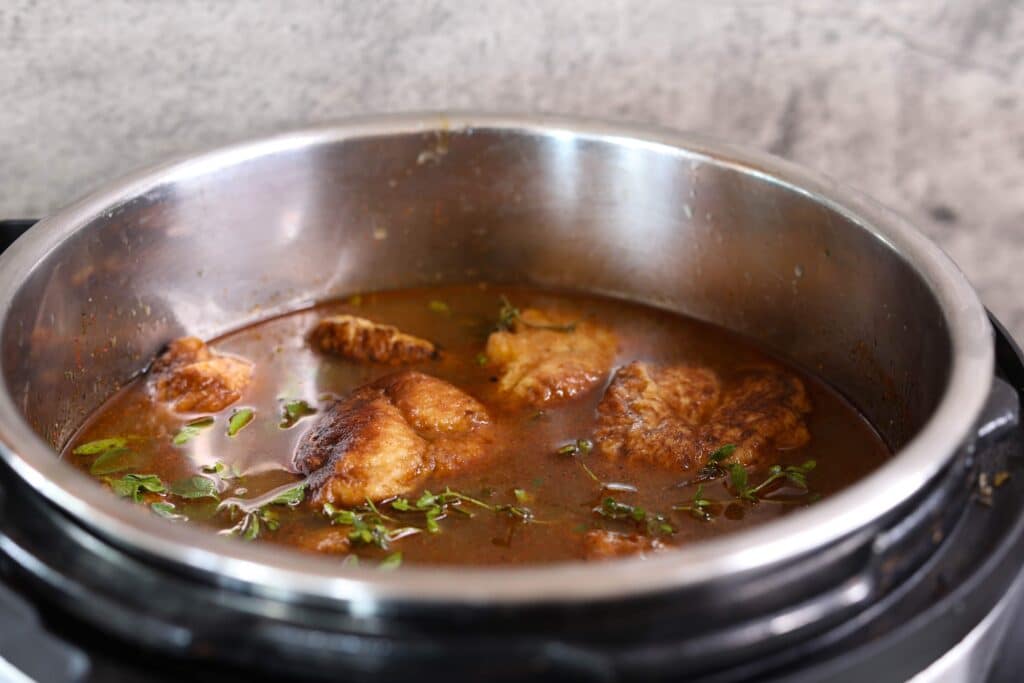
Simmering
Place your fried seitan into a stock sock or inside of a cheesecloth. Wrap it tightly! This is another measure to help keep the seitan having a shreddy texture.
You can create your own broth for simmering the seitan or you can use a premade vegan chicken broth. If you are using a premade broth (like from a carton) add in extra seasonings.
This is where the seitan is getting most of its flavor! Create a concentrated, hyper flavorful broth!
Consider creating a broth with black garlic, caramelized onions, fennel, thyme, mushrooms seasoning, MSG, smoked salt, smoked paprika, and smoked yeast.
The seitan has the best result if you let it simmer overnight.
Use a slow cooker on an Instant Pot on the slow cooker setting is the easiest way to do this. You can simmer your seitan on the stove, but it is risky.
The reason it is best to cook your seitan on low on slow cook in the instant pot or on low in a slow cooker is that is has a controlled low temperature.
If the temperature is too high when you cook seitan it will expand quickly- and create large holes. The holes create a spongy texture.
The seitan needs to be cooked at a low temperature to prevent that expansion. If you cook it on the stove, it is easy to accidentally have it at too high of a temperature.
The seitan needs to be simmered slowly, so slowly that it is barely bubbling. Since it is cooked at such a low temperature, it needs at least 8 hours to be cooked through the middle.
You can’t overcook the seitan when it is simmering like this. You will have a marvelous result if you leave it to simmer for 24 hours.
Resting the Seitan
After it has simmered overnight it is ready to go! You can eat it right away.
If you let it rest one more day in the fridge after the seitan will continue to firm up and have an even better texture!
The seitan will stay good in the refrigerator for up to 6 days, and in the freezer for up to 1 year.
Ways to Serve
Treat your seitan at this point like chicken. It tastes much better fried up with some sauce or breaded and fried into tenders- or added to soup! It’s fantastic in tacos, over ramen, in noodle soups in general, or tossed into a stir fry.
Looking for other Vegan Staple Recipes?
- If you love seitan chicken, how about seitan steak? This seitan steak recipe is perfect for grilling season!
- Cultured Sunflower Cream Cheese is a probiotic cream cheese that is perfect for smears!
- Try saving some money by making your mayo at home! This sunflower mayo has hidden health benefits from the addition of Irish sea moss.
- Looking for another vegan chicken recipe? Try this Kentucky fried hen of the woods! It’s a meaty, juicy mushroom that tastes chicken-like!
Wash the Flour Seitan Chicken
Equipment
- Slow Cooker/Instant pot You can simmer it over the stove too!
- Frying Pan
Ingredients
Dough
- 5 lbs Bread Flour
- 6 Cups Water
- 2 tbs Salt
- ¼ Cup Coconut Oil or any neutral oil
Seasonings
- 1 tbs Mushroom Seasoning
- 2 tbs Smoked Torula Yeast Or Nutritional Yeast Flakes
- 2 tsp Onion Powder
- 1 tsp Garlic Powder
Simmer
- 8 Cups Vegetarian Chicken Broth Concentrated if possible, or a concentrated Vegetable Broth
- 1 tbs Light Miso
- 2 tbs Poultry Seasoning
- 2 tbs Mushroom Seasoning
- 1 head Black Garlic Optional
- 1 Small Yellow Onion Caramelized, Optional
Instructions
- Add the Flour to a large mixing bowl with the 6 cups of Water, mix to create large ball of dough. Knead it for about 1 minuteLet it rest for 1 hour
- Knead the dough. Stretch it out and fold it over itself a couple of times. Now cover the ball of dough with water so it is completely submerged, sprinkle in 2 tablespoons of Salt. Let this rest over night or for about 12 hours in the refrigerator. A longer rest helps the dough develop gluten without you having to knead the dough. If you don't knead the dough long enough or let it rest long enough, you will have a smaller yield. In another words, the protein needs to be worked or have time to develop in order to prevent waste. You will have an easier time washing the dough after a long overnight rest and some initial kneading.
- Pour out the water the dough was sitting in, and refill the bowl with cold water. Knead the dough under the cold water and you'll notice clouds of white starch separating from the dough. Continue to do knead until the water is thick with the starch. Using a strainer, strain away the starch water from the dough. Pour the starch into jars and save for another recipe. Continue to knead the dough and pour out the starch water until the dough washes away clear.
- Stretch out your dough and sprinkle over all the seasonings. Knead it into the dough by stretching and folding it. Some of the seasonings won't be worked into the dough- that's ok, just work as much as you can into itLet it rest for 1 hour
- Stretch out your dough and fold it into itself. Then squeeze it out into a long rope. Create tight knots throughout the dough. Knot the dough into itself to create a knotted loaf. This helps create a shreddy texture.
- Add a pan to high heat and add Coconut Oil. Pan fry the knotted loaf of dough until most of exterior is golden brown (roughly 5-7 minutes)
- Using either a cheesecloth or stock sock, place your loaf inside and tightly wrap it.
- Add 8-10 cups of Vegetarian Chicken Broth or Vegetable Broth to a slow cooker or Instant Pot. Add in additional flavorings to make this broth very flavorful. Add 2 tbs mushroom seasoning, 2 tbs poultry seasoningAdd the wrapped loaf to the broth and slow cook on low for 10-24 hours. (You can't overcook seitan this way, it's best on a very low heat for a long time*)Do Not Simmer at Too High of a Heat! This will cause the seitan to expand too quickly and result in bubbles that will lead to a spongy texture.
- Remove from the broth. If you let it rest overnight at this point the gluten will continue to develop into a very shreddy seitan. However, this is completely optional! It is ready to eat/ cook with at this point! It is recommended to pan fry, bake, or air fry your seitan.
Video
@jess.flowers 1 5lbs bag of bread flour 6 cups of water (to form dough ball) To season: 1 tbs mushroom seasoning 2 tbs smoked nutritional yeast 1 tsp garlic powder 2 tsp onion powder Simmer in: 8 cups vegetarian chicken broth Create the ball dough, cover in salted water overnight. Strain and add more water and knead the dough under the water. Strain away the starch and milky water. Continue to knead and strain the water until its clear. Knead in the seasonings and let rest 1 hour. Stretch out the dough, then fold it together, then knoting it. Add 1/4 cup oil to a hot frying pan and pan fry the knotted seitan dough. Cook until it is golden brown. Then place inside a cheese cloth, wrapping it tightly. Simmer the seitan in a very flavorful broth on low heat (IP on slow cook low) for 12 hours. Let rest for 12-24 hours for a shreddy texture. #homecooking #homemadefood #seitanrecipe #seitan #cheapmeals #cheapvegan #veganrecipes #budgetmeals #foodietiktok #veganchicken #plantbasedrecipes ♬ Chopin Nocturne No. 2 Piano Mono – moshimo sound design
Notes
Use cold water when washing it! Cold water helps the gluten seize up, making it easier to work with.
Using a strainer can help keep the gluten together while you are washing the starch out. Continue to knead the dough and strain it- it will firm up!
One thing to consider is a longer rest time and kneading the dough initially helps the gluten develop and keep together better.
If you having difficulty have the dough stick together, did you let it rest overnight in salted water before washing?
Did you knead the dough before let it rest overnight? Can I Speed Up Cooking My Seitan On a Higher Heat?
Absolutely not!
If you simmer your seitan at too high of a heat it will create air bubbles and create a spongy texture. Cooking it on a low simmer where it is barely bubbling, or not bubbling at all prevents the bubbles inside. Because this is a large loaf of seitan, cooking it a lower temperature does take more time. This method will help you get a shreddy, yet juicy “chickwheat”. Storage
The seitan will stay good in an air tight container in the refrigerator for up to 6 days. Otherwise freeze in an airtight freezer container for up to 1 year. If anything, the texture gets better after you freeze it!
Try breading chunks of your seitan and freezing- reheat in the air fryer from frozen at 400F for 8 minutes Making a Super Flavorful Broth
Since your seitan will taste like your broth it’s important to get it very flavorful. Consider caramelizing an onion or two, adding in some black garlic, miso, or shiitake mushrooms. If you are using a premade bullion-based broth, increase the amount of bullion you use.
If your broth isn’t flavorful enough, the seitan can be bland. Which is still fixable! Just shred it up and marinate it in your favorite sauce before cooking.
Did you try this recipe? Please help my website grow and give it a rating!
The recipe says ‘1 5 lbs Bread Flour’ – does that mean ‘15lbs’ or ‘5lbs’?
I meant 1 5lbs bag of flour- so 5 pounds of flour! I’ll update the recipe
Hi, Jessica! Thank you for the post, videos, and this wonderful new seitan recipe. Would you kindly link to your recipes for using your starch strainings?
Happy Spring and thanks again 🌞☺️🙏🌷
If you are cooking it on the stove, and not in a slow cooker, how long do you cook it for? Very low simmer or even lower heat?
Thank you so much for this recipe! It looks amazing!
If you are cooking the seitan on the stove rather than a slow cooker you’ll want to keep it at a very low heat. The seitan needs a long and low heat. The reason you can’t have a full on simmer with bubbles is because that can make the seitan expand too quickly and will create air bubbles. This creates a spongy texture in your seitan. To keep it meaty and shreddy you need to have it cook at a low temperature to prevent those bubbles!
This was the absolute best Seitan that I have ever made and tasted! The video really helped me as well. Thank you! Am I able to freeze some of it for later? Thank you!
The texture gets even better if you freeze it! It freezes indefinitely, after 6 months it can dry out. In that case simmer it in some more broth or use it in soups!
Try shredding it into chunks and breading it before freezing so you have some quick tenders you can quickly bake, fry, or air fry to reheat
Hi Jessica
I’m in the washing phase of this recipe and my dough is really spongy looking and not sticking together. It is also taking forever for the water to run clear. Wondering what I did wrong.
Thanks!
It takes a while before the water turns clear! You aren’t doing anything wrong- the gluten comes together the more you wash it. It can fall apart if it is too warm, then I suggest setting it in cold water and let it rest in the refrigerator for a few minutes before washing more. That always helps with firming it up!
I have some tricks and tips videos up on ticktock that might help with washing the starch out. This video might help!
https://www.tiktok.com/@jess.flowers/video/7276190876815068459
Should the instant pot vent be open or closed during the 24 slow cook? Thank you!
I leave it closed, just make sure it’s on the lowest heat setting! If it gets too hot your seitan can get air bubbles that will result in a spongy texture
If I want to start the process now (8:00 am) would it be ok to leave in the fridge until tomorrow before I start rinsing?
Yes! You will be fine to leave it in the fridge for up to three days before washing. However, do not leave it on the counter (room temperature) for more than overnight, otherwise it will start to ferment! Then it is incredibly difficult to wash the starch out from that point.
Are you able to tell me, once the seitan is washed how much protein is in 100g of seitan when using bread flour that’s 12g of protein per 100g.
Thank you
According to Cronometer, 100 grams of seitan has 21.2g of protein
I also used King Arthur Bread Flour, but it took me nearly an hour and a half to wash out all the starch from the dough. The resulting weight was about 2lbs 2oz, less than half the starting weight. Did I do something wrong? Does the slow cook process rehydrate the weight back to 6lbs?
It takes me around 40 minutes to get all the starch washed out- and it does expand after you cook it! Make sure you save the starch, it is great for homemade pasta, crackers, and its great for Chinese veggie pancakes!
There are a few things that can increase your yield. Stretching and folding the dough (as if you are baking sourdough) before you soak it in salt water overnight really helps increase the gluten. Letting the dough soak in very salty water overnight in a cool place also helps, heat decreases the strength of gluten.
Otherwise just over two pounds for a five pound bag of flour is pretty typical, it will expand after it cooks
Thanks for your recipe. I didn’t know about adding salt in the water. I start of with one kilo flour containing 11 to 12% protein.
For cooking, I cook on a stove with a old fashion Dutch flame spreader / heat diffuser and one hour simmering in broth gives me a good result. I can eat it after cooling and shredding but mostly leave it over night (or longer) in the fridge.
What is the difference in cooking for hours in stead of one hour ?
One kilo is only 2lbs, and my recipe calls for 5lbs of flour. Because it is a larger seitan roast it takes longer for the center to be fully cooked. I have uncooked so many seitans in the past and rather play it safe by slow cooking it for longer. While it’s easy to undercook seitan, you can’t over cook it by simmering.
Hi, do you think this recipe would fit/work in a 3 quart instant pot? Your instantpot looks like one of the bigger ones. It seems like I could just toss the seitan in and fill it up with as much of the broth that will fit, hopefully?
It should fit in a 3 quart instant pot, there’s always extra space in mine!
Thanks for the reply, it worked out perfect! Wonderful recipe. For anyone else with a 3 quart instant pot, I only needed about 4-5 cups of broth.
Thanks Jess! Great recipe (and sciencey stuff too!). I make the ‘pig saver’ ham fairly regularly and have made (unexpectedly) a corned beef-like one when I had a go at making the same thing using whole wheat flour.
I’ve made this recipe once, using sifted whole wheat flour (to remove a lot of the bran and to try and make it more ‘whole food’) and it wasn’t bad, but I’m using strong flour next time to get the awesome version/result 🙂
If you come up with a way to make a ‘Lamb’ version it’d be appreciated by us down here in New Zealand, and the Aussies, and others I’m sure!
I’ll start recipe testing a seitan lamb- (or seitlamb) right away!
That’s great, thanks Jess! Looking forward to seeing what you come up with!!
I’ve made some jackfruit ‘lamb’ before which came out really good, using the “Moroccan Jackfruit ‘Lamb’ with Lemon Couscous” recipe on the Bosh.tv site as a guide. Yummo! I’ll see how easily I can incorporate those flavours into your WTF seitan dough 🙂
This recipe is so amazing! I used to be a chef here in NZ while I was omnivore, moving down the stages through to becoming vegan (a little after I stopped cooking for a living). I’ve learnt about sooooo many things as a vegan, with many go-to recipes (I may have tweaked some a bit) for homemade vegan meringues, ‘dairy’ and ‘meats’. This has quickly become my absolute, 100%, no question favourite ‘chicken’ recipe. I’d made my own ‘chicken’ and ‘turkey’ before, using vital wheat gluten and tofu/chickpeas, but they pale in comparison to this. the taste, the texture – all of it. Incredible!!
I’ve yet to make your ‘Turkey’ Jess, but I am extremely confident it will also be a winner – so much so that I plan to add that, plus my slightly tweaked version of the ‘Bold Flavor Vegan’ pig saver ham (https://boldflavorvegan.com/2024/01/20/vegan-seitan-ham/) to our next Christmas dinner… maybe a mid-winter ‘Christmas’ dinner!
Thanks for putting up such an awesome recipe with great tips, tricks and general information. You’re doing an awesome job!!
Now you just need to come up with a WTF lamb recipe 🙂
I tried this and it failed! King Arthur flour, I washed in cold water about 8 times and it looked good. Braided and knotted, fried (2.2 lbs at this point, not bread flour) and cooked at 140° for 13 hrs and it was just a globby stringy mess when I removed it. Don’t know what I did wrong.
It’s hard to know exactly what went wrong without being there, but my best guess is that it wasn’t washed enough. Using a stock sock to stuff the seitan inside could also help, but if the texture was too soft and you had a stringy result- my guess is that it wasn’t washed enough. I put in this video to help you see how to tell when your gluten is washed enough. I hope this helps!
I started out with the original 5lb version and life intervened and my dough was in the fridge for 3 days, I ended up throwing it away because even though it was submerged it seemed very dry in the center. Not smooth at all and I was getting these globby bits coming off of it (look like “fatty” chunks and would not reincooperate into the dough).
Second attempt – I am working with 1 lb of bread/pizza flour and water to ratio. Same thing is happening. Have washed 5 times and now it is falling apart into these globby, chunky bits.
I also don’t use TikTok so… looking for help with this.
I go into detail about making seitan on Youtube in addition to TikTok- I also wrote about it in depth in the article above.
It sounds like you are not washing your dough enough.
You don’t need to change out the water as often as you are describing, you want to knead the dough under the water until the water is very thick with starch.
You want to continue to knead the dough under the water until there are no pockets of starch and the dough itself looks webby and has an elastic spring to it. Those globby bits is simply part of the dough and will combine with the rest of the dough if you simply press it together.
As you wash away the starch the dough will begin to fall apart. If you knead you dough, use salt to soak it in, and use a high protein flour your gluten will be stronger and it will stay together better.
You smoosh the pieces back together and continue to work the dough- it will become stronger.
Make sure you are kneading the dough in cold water and add in salt to help strengthen it.
If you leave your dough soaking for too long it could start to ferment. You can tell the dough has started to ferment if their is bubbles coming up through the water. If your dough ferments before you get to wash it, you cannot use it. The reason is fermentation breaks down gluten- this recipe starts with separating starch from gluten so if the dough ferments you no longer can extract that gluten.
You are better off washing the flour the same day you knead it rather than a few days later because of the fermentation risk.
I’m making this for Christmas this year so wish me luck! Just wanted to ask – at step 4, after washing the dough, could I let it rest overnight then wrap in the muslin and cook in the slow cooker the next morning? Would it be okay? Just want to spread out the steps over a few days to make it easier on me! Thanks!
You can absolutely do that, just season the dough first before you let it rest. You will have an even better result with spacing it out!