This seitan turkey roast is made from flour washed seitan for the best flavor that will ‘wow’ your guests!
This seitan turkey has a crispy skin, shreddy layers, while staying juicy in the center. You’ll never want to buy one of those premade seitan roasts ever again- they don’t even come close to this!
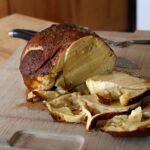
This is the best Vegan Turkey for Thanksgiving or Christmas!
This is the best vegan turkey recipe for impressing your friends and family. This standout recipe that has a better flavor because it doesn’t have vital wheat gluten, and it has a crispy, meaty skin! A skin that falls off the meat of the seitan! After months of perfecting this recipe, I’m very excited to share it.
Seitan from Flour: Why Make Seitan from Bread Flour Rather Than Vital Wheat Gluten?
This recipe is made from bread flour rather than vital wheat gluten because the flavor is so much better! Vital wheat gluten leaves an aftertaste that is tricky to mask. That aftertaste is not present in washed flour seitan! Once you make seitan from flour rather than vital wheat gluten it’s hard to go back.
Flour washed seitan is also easier on your stomach and easier to digest compared vital wheat gluten. It’s common to have some digestive issues after eating vital wheat gluten, but it’s not an issue with this method!
Another factor to consider is that a bag of bread flour is going to be cheaper than vital wheat gluten.
Now be aware that this recipe takes 3 days to make- it takes a little bit of preparation! But it’s 100% worth it, I personally make a version of this recipe biweekly.
Washed Flour Seitan Turkey Schedule
Day 1: Add Flour to water to create a ball of dough. Cover in salted water and let sit overnight.

Day 2: Rinse salted water and knead the dough under water to remove the starch. Season and shape the gluten, wrap it up, and let it simmer overnight.

Day 3: Unwrap the seitan and roast in the oven. Ready to serve!
Seitan From Flour
This recipe is a variation on my flour washed seitan chicken recipe. The main difference is between these two recipes is this one uses a ‘fat sauce’. The fat sauce helps create separation in layers giving you a more shreddy seitan, yet the layers are very soft and tender from the added oil. It also helps create a ‘skin’ for the seitan. The ‘fat sauce’ helps prevent the seitan from being a solid mass, and essentially laminating the seitan for pull apart layers.
Another difference is with the seasonings. Since turkey has a more ‘earthy, gamey’ flavor compared to chicken a few additions are added to the broth to get that flavor. The addition of miso and shiitake mushrooms help add that iron, earthy flavor that is in turkey.
The last difference is this recipe has you roast and baste your seitan turkey after it has been simmered. The simmering stage helps cook all the gluten into a firm, meaty seitan. Then you baste and roast it to create a chewy, crispy, meaty skin- all while the center remains juicy!
Is Seitan Healthy?
Seitan is a high protein, low carb, low fat food- making it very healthy! This recipe makes 3lbs and 3 ounces of seitan out of the 5 pound bag of flour, which gives you about 6.18 grams of protein per ounce.
This recipe isn’t for anyone who has celiac. Seitan is wheat protein- or wheat gluten. Wheat is made up of starch and gluten and this recipe has you separate the starch from the gluten.
If you have an allergy to wheat, don’t make this wheat-based recipe! For anyone else who enjoys foods that contain gluten, this recipe is a fantastic source of protein!
Protein is made up of amnio acids, seitan has all the amnio acids but has a low amount of lysine. Many people overplay the ‘complete protien’ bit, where your body will have no issue getting all the protein it needs as long as you eat another food during the day with lysine. Most foods (almost all) contain some kind of combination of amnio acids. As long as you eat anything else during the day, you’ll have all the amnio acids you need!
If you want to strictly check your daily values, I recommend using a food diary like Cronometer. That’s the only free website that I know of that tracks your micronutrients, I was introduced to it by my Human Nutrition professor at University of Minnesota.
You don’t need to eat any other protein dense foods to get a ‘complete protein’, just eat another food that is nutrient dense throughout the day.
Seitan is almost pure protien and is part of a healthy diet! If you are a person who wants some delicious protein, seitan is the food for you!
Getting Started
The first step to this recipe is to add about 7 cups of water to 5lbs of bread flour. Then you knead it into a dough and cover it in salt water. The addition of salt during this stage is beneficial for several reasons:
- Salt enhances the hydration of gluten proteins, making them more elastic and cohesive.
- Salt reduces the presence of free sulfhydryl groups (SH) in gluten proteins, which are responsible for breaking and reforming disulfide bonds (S-S) that link different protein chains together. This stabilizes the gluten network, preventing it from breaking down easily.
- Salt increases the beta-sheet structure of gluten proteins, a secondary structure that provides strength and rigidity.
- Salt promotes the macromolecular aggregation of gluten proteins, leading to the formation of larger complexes.
In simpler terms, salt helps strengthen the gluten network. This results in a higher yield since less gluten is broken down during the washing process. When people notice their dough falling apart while washing the flour, it can be attributed to insufficient resting time, or omitting salt during the resting period.
How to Wash the Flour
This is the most challenging part of this recipe. Washing the starch away from the ball of dough is intimidating the first time you do it. But once you have your first success with it- you’ll be addicted! Especially if you normally make seitan from vital wheat gluten!
Because it took me a two failed attempts to figure out washing the flour, I made multiple videos with tips and tricks on how to be successful. Now that I understand how to work the dough and how to know when it is fully washed, I make this recipe frequently. Once you learn how to make your own seitan, it will be tough going back to buying overpriced premade vegan meats (almost all are seitan).
I recommend you watch the videos on making this seitan and washing the flour!
Get Your Hands Dirty
Think of this step as squeezing out the starch.
The smooth ball of dough will be transformed into a web like structure, showing strands of protein. When you squeeze a section of the dough under the water you can literally see the starch separate out. Anywhere where the dough looks smooth, there is starch to squeeze out. The more you squeeze and work the dough, the cloudier the water becomes. Be gentle so you don’t tear the dough.
After you squeeze the dough there will be a point where the water is very milky and thick with starch. Pour that into another bowl or jar to save for later. You can use this wheat starch water like any other starch. It can thicken sauces, made into steam noodles, added to pasta dough, or you can make a wheat starch specific recipe with it.
You’ll keep squeezing the dough under water for about 25-40 minutes (depending on how fast you work or if you are taking breaks!). If you are halfway through washing and starch keeps coming out of the dough- take a break! I’ve had other people say that the starch doesn’t stop coming out of the dough. I’m here to say you need some patience with this step because it does take roughly 30 minutes for the starch to completely separate from the gluten.
Put it in the refrigerator since the gluten is strongest when it is cold and your hands will warm up the dough as you knead it. This means after washing the dough it can start to feel like it is coming apart because it is getting to warm from your hands. Adding ice cubes or placing it in the fridge helps prevent that.
The gluten will be done when it looks like webby, no smoothness to the dough, and it rinses mostly clear. It doesn’t need to rinsed to be 100% clear, but to the point where there are no pockets of starch left in the dough. Just make sure there are no smooth pockets in your webby dough! The more you rinse the dough to be clear, the better layers and shreds you’ll have in your seitan.
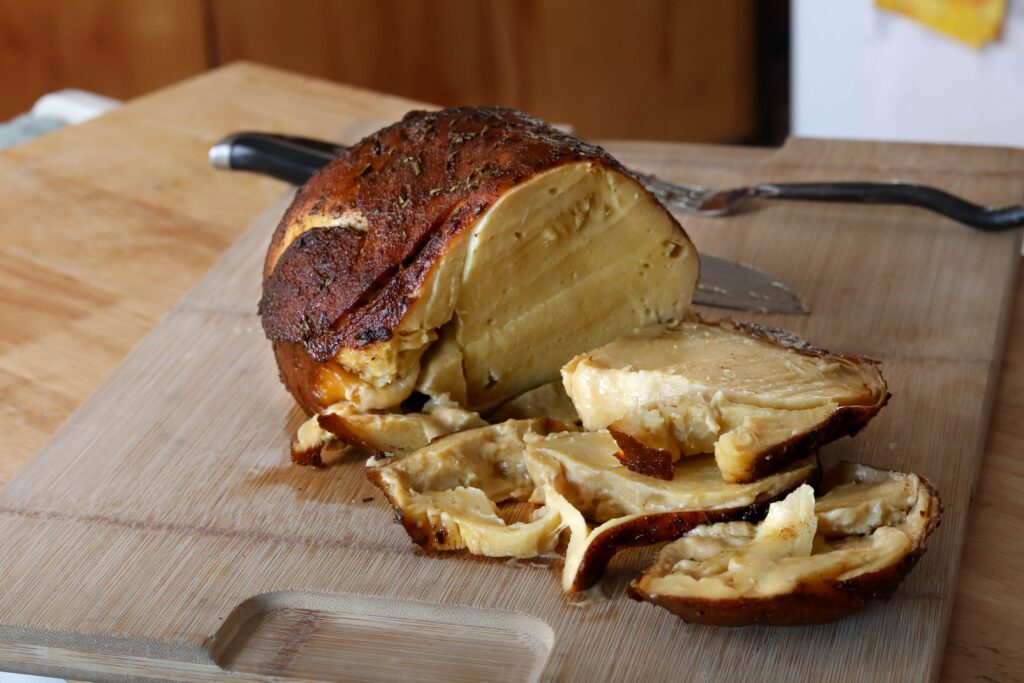
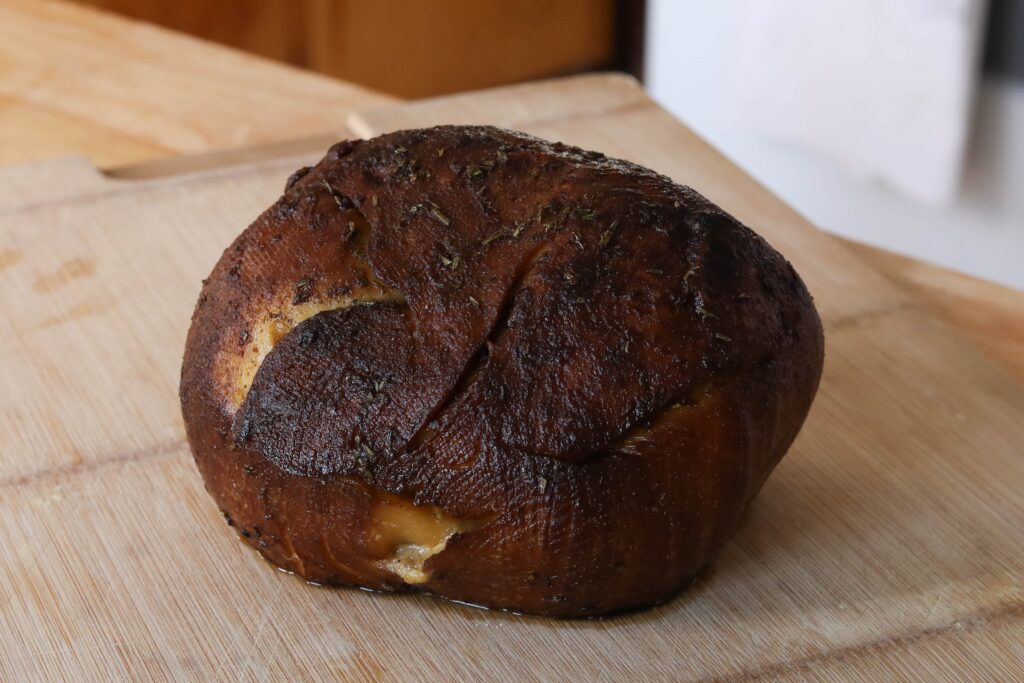
Seitan Turkey with a Skin
Now that you’ve washed the flour and have pure gluten and wheat starch water we can form our seitan to be a vegetarian turkey!
Set your gluten aside in a bowl and water will leak from the gluten. Pour away any water that comes out of your gluten.
Create a “fat sauce” out of the wheat starch water, oil, and seasonings. If you are familiar with pastry baking, think of this step like creating a fat for laminating the seitan. If you did only oil and seasonings, the gluten would absorb it and there wouldn’t be separate layer. You would be left with a moist loaf- which is great for slicing for sandwiches.
But to have a Seitan Turkey for a holiday roast, you’ll want a skin and layers. The wheat starch helps break up the gluten so the layers come apart and you are left with a more realistic meat like seitan.
In order to have a crispy, meaty skin with a moist center you’ll need to create the ‘fat sauce’ so there are separate layers.
I like using the smoked yeast because the flavor is full of body, but that is totally optional! You can swap out the coconut oil for another oil if you prefer. I would recommend a neutral flavored oil if you don’t use coconut oil.
How to Form Your Seitan Turkey
After the gluten has rested and lost some water it’s ready to work with. Letting it rest is important because if your gluten is holding too much water it won’t keep it’s shape when we are forming the seitan. It’s also messier if you don’t let it rest as water will leak out of the gluten while you work with it.
Divid your gluten into two chunks, separating roughly 1/3 of the gluten from 2/3 of the mass. Set the smaller chunk of gluten aside, and stretch out the larger chunk into a rope. Coat the long rope of gluten with your fat sauce.
Create tight knots in the rope of gluten without tearing it. Continue to knot it until it is one big knotted loaf. Do another coating of the fat sauce over the knotted loaf.
Stretch out the smaller portion of the gluten into a flat rectangle and coat one side with any remaining fat sauce. Wrap the rectangle of gluten around the knotted loaf with the fat sauce inside the loaf itself. This is how we make our skin for our seitan!
Now tightly wrap your loaf into some cheesecloth to keep it together. The tighter the loaf the rounder your seitan will be- also keeping it tight will help you get a better textured seitan.
Vegetarian Turkey Style Broth
This recipe has you make a broth that tastes very similar to turkey! To create this broth you’ll need vegetarian chicken bullion, onion, shiitake mushrooms, and miso. The additions of the mushrooms and miso helps add an iron like flavor and further depth. Turkey is typically more ‘gamey’ in flavor compared to chicken. The shiitake mushrooms helps add that funky flavor that makes it taste more like turkey.
When you are done with making seitan you’ll be left with lots of this broth. It’s a great base for soups! It’s phenomenal in my Chicken of the Woods Wild Rice Soup or any soup that uses ‘chicken’ broth. You can also reuse this broth for another batch of seitan!
I typically pour my leftover broth into glass jars with about 2 inches of head space and store them in the fridge. Once they are fully cooled off I’ll put them in the freezer so I can ready to go broth for a future recipe.
The broth stores in the fridge for about 1 week and will last for up to 3 years in the freezer.
Simmering Your Seitan
Once your seitan is wrapped up it’s ready to simmer in your broth. Seitan needs a long and slow simmer. If you don’t cook it long enough it will have a soft and doughy texture. If you cook your seitan at too high of a temperature it will expand and create air bubbles- giving you a spongy texture.
The simplest way to accomplish this is to use either an Instant Pot or Slow Cooker. Both of these devices have a setting for slow cook on low that you can safely leave on overnight. All you need to do is add the wrapped seitan into the broth and leave it on slow cook for at least 6 hours.
The beauty of this is you can’t over cook seitan this way. If anything, the longer you leave your seitan simmering the better the results! One of my best seitan’s was when I forgot about it in the instant pot when it was on slow cook over the weekend. It was left simmering for 36 hours! The seitan picks up the flavor from the broth and the longer it rests, the more shreddy the texture gets.
Let it simmer for at least 6 hours to ensure it is fully cooked, but ideally, you’ll let it cook overnight.
Roasting Your Seitan Turkey
The final step of making this seitan turkey is to oven roast it!
You’ll unwrap your seitan after you remove it from your instant pot. From there you’ll cover it in some seasonings and add it an oven friendly pan with some of the broth.
You’ll roast the seitan for about an hour, basting it every 15 minutes. This is how you get your crispy and ultra flavorful skin!
Once it is roasted it is ready to serve!
What to Serve with your Vegan Turkey!
This is a recipe I make for Thanksgiving, but it is also great for Christmas, or your Sunday Roast.
- Being raised in Minnesota, you can’t have Thanksgiving without some Wild Rice Stuffing! This stuffing is a veganized version of my family recipe. It’s perfection with this seitan turkey!
- Even vegans love their wheat meat and potatoes, these Crispy Roasted Potatoes are a great side dish!
- Roasted Butternut Squash is one of my favorite Thanksgiving sides and is awesome with some Roasted Seitan Turkey!
- A quick and healthy side to go with this seitan turkey is Air Fried Brussels Sprouts! These brussels sprouts are nice and crispy with a savory flavor.
- This sourdough recipe is one I save for when I want to impress my guests, Sourdough Garlic Pull Apart Bread! This bread is loaded with garlic and is the perfect holiday side.
Seitan Turkey
Equipment
- Instant Pot or Slow Cooker, or Large Stock Pot
Ingredients
Seitan Base
- 5 lbs Bread Flour
- 7 cups water
Fat Sauce
- 2 tbs Wheat Starch Saved from Washing Step
- 2 tbs Vegetarian Chicken Bullion
- 3 tbs Coconut Oil
- 1 tbs Smoked Yeast Optional
Turkey Style Broth*
- 3 cloves Garlic
- 5 Large Shiitake Mushrooms Preferably dried
- 1 Small Yellow Onion
- 1 tsp Smoked Salt or black truffle salt, or sea salt
- 8 Cups Water or Aquafaba
- 2 tbs Miso Light variety
- 4 tbs Vegetarian Chicken Bullion
Seasonings for Roasting
- 1 tsp Smoked Paprika
- 1 tsp Marjoram
- ½ tbs Poultry Seasoning
- 1 tbs Rosemary
Instructions
Create a Dough Ball
- Add the flour and water to a large bowl and knead together into a doughLet rest for about 30-60 minutes or until the dough is smooth Stretch the dough out and fold it over itself to knead it. You have the option to repeat stretching and folding every 40 minutes- this helps strengthen the gluten in your dough so you have a higher yield. It is completely optional and not required.
Cover in Salted Water
- In a large bowl or pitcher add roughly 8 cups of water to about 2-6 tbs of salt and mix well to create very salty water. Pour the salted water over your dough ball- ensure that the dough is completely submerged in the salt water. Let this rest overnight, ideally in your refrigerator but you can leave it on your countertop safely. *This will not make your seitan salty- it will be poured and washed away. The salt helps strengthen the gluten*
Washing Away the Starch From the Gluten
- Pour away the salted water. Add clean cold water to your bowl with the dough and gently knead. As the water becomes thick and cloudy from released starch pour away the starch water into a large bowl and set aside. Continue to knead the ball of dough under cold water. If it feels like the ball of dough is coming apart add ice and let it rest. The cold helps the gluten seize up and makes it more managable to work with. As you knead it the texture of the dough will become weblike. Knead the dough in cold water until no more starch is released (the water stays clear when kneaded). Look for smooth pockets, those are areas that still have starch in them and you'll want to knead that out. This washing step takes about 30 minutes and you'll notice the ball of dough will shrink up quite a bit as it looses starch. Once all the starch is removed, let the gluten rest in a bowl for 1 hour. It will release water as it rests, pour that away.
Creating the Broth
- *You can completely skip this step if you are using premade vegetarian chicken broth. The broth will further flavor the seitan, do not simply use a vegetable broth- because then your seitan will have that flavor. No one wants a carrot flavored seitan! You can always add some vegetarian chicken bullion to a vegetable broth to make it taste more like poultry.
- Slice your onions and crush and mince your garlic.In either your instant pot, or a large stock pot (wherewhere you want to cook your seitan!) preheat. Add a little bit of oil and add the onions, garlic, and mushrooms. Saute until the onions are translucent
- Add the rest of the ingredients for the broth and mix well. Lower the heat so it is barely simmering or set to slow cook on low for the instant pot.
Forming the Seitan
- Your large bowl of starch water should have separated by now, pour off the water that is over the surface. Take 2 tablespoons of the wheat starch and add it to a small bowl. Mix in the rest of the ingredients for the 'fat sauce', the coconut oil, bullion, yeast.
- Remove about 1/3 of the gluten so you have two chunks. Take the larger chunk and stretch it out into a long tube. Lightly coat the strand with the 'fat sauce'. Create tight knots with the gluten, knot it up with itself to create a roundish loaf. Coat the knotted loaf with more of the 'fat sauce'. Take the other chunk of gluten that was set aside and stretch it over the knotted loaf. This creates a skin that will encase everything. Tightly wrap your loaf in cheese cloth or inside of a stock sock
- Submerge your seitan into your prepared broth and let it slow cook. It's recommended to slow cook in an instant pot or slow cooker on low overnight.If slow cooking over the stove let it simmer for at least 4 hours (or until it is nice and firm). *You can't overcook seitan in this stage, however it will be very soft and doughy if it is not cooked long enough. It needs a long, slow cook for the best results. Increasing the heat will not speed this stage up, too high of heat will result in bubbles. Creating a spongy texture*
Roasting the Seitan
- Preheat oven to 350 degrees
- Once the seitan is nice and firm remove it from the broth and remove the cheese cloth. Place it inside of a baking sheet or casserole dishAdd about ⅓ cup of your broth to the base of the pan along with 2 tbs of oil. Lightly coat your seitan in oil and sprinkle over your seasonings.
- Bake in the oven for 1 hour, but every 15 minutes or so baste the seitan. Do this by dipping a brush in the roasting liquid and recoating the seitan. This helps prevent it from drying out while still giving you a crispy skin.
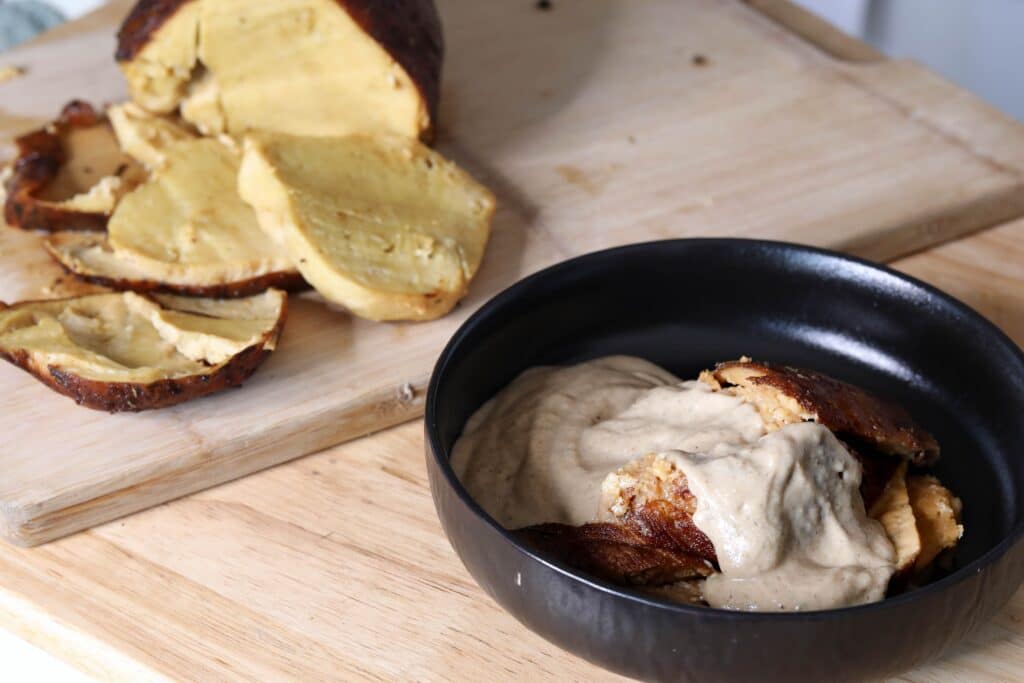
- Serve your seitan with your favorite gravy, cranberry sauce, and enjoy!
Video
Did you make this recipe? Please help support my blog by giving it a quick rating!
Hey there! I’m super stoked to try this recipe! I’m wondering if you can help me figure out a little more detailed timeline for each step? I might just be reading it wrong, but it seems like it’d be possible to do it over 2 days: Make and soak the initial dough overnight, then rinse it out the next morning and simmer it in the instapot that same day, and finally roast it that same evening. Is that right or is it best to wait until the second night to simmer in the instapot? I also thought maybe the dough could be made in the morning, then rinse it in the evening and put it in the instapot overnight….. I’m totally down to do it over 3 days, just want sure which parts to give proper time to. Thank you so much for all this great info! Your recipe looks really incredible and I can’t wait to try it ✨🦃
My only concern is I’m not sure that would be enough simmer time for the center to get fully cooked if you roasted it the same day. I prefer to err on the side of caution because its difficult to fix an under cooked seitan roast after it’s been roasted. You can’t simmer it too long; I’ve let my seitan simmer an entire weekend once because I forgot about it and it turned out amazing. However, the times where I’ll only simmer it for 5 hours will often still have a slightly doughy center it was a disappointment. You can shred it up and simmer it longer (to fix it), but when I’ve tried baking it for longer it gets too dried out and the texture isn’t great.
Now if you divided out the dough into two smaller roasts rather than one large one- it would totally work! The main issue is the one large roast can take more time to cook the center. If the roast is smaller you can get away with a shorter simmer time.
If you are up early and are able to wash it and simmer it for at least 6 to 7 hours, you could roast it later that night! Check on the it as it simmers, if it feels like it’s really firmed up, trust your instincts and roast it!
Thank you so much for not only providing such concise instructions and a great video, but also for making this method accessible. I’ve wanted to try it for awhile now but never felt comfortable. I’ve made your turkey roast three times and my meat eating brother enjoyed it, too! Thank you so much, now I’m ready to try another recipe!!
To be honest i bought vital wheat gluten to spare me the washing prozess, so whats the difference, why do you say its better to wash it on your own?
The main difference between seitan made from VWG and WTF is flavor and digestibility.
Vital wheat gluten (VGW) has a distinct smell and taste. To mask that smell and flavor you’ll need to heavily season it and odds are, you’ll end up having to use more salt (vegetarian chicken bouillon is very high in sodium).
Seitan made from washed flour (wtf) is flavorless until you season it, so you don’t need to use as much seasoning to make it taste lovely.
Next is digestibility. VWG is much harder on the stomach and can cause an upset stomach. I have no issues digesting WTF seitan on the other hand.
I don’t know the exact science as to why it is easier to digest but I have a theory.
When you soak the flour overnight it is almost like a fermentation process. It helps rehydrate the bran of the grains (even if they are ground up into flour) and that makes it more permeable for our digestive system to process. The next theory is freshness. If you buy wheat berries they stay fresh for years until you grind it into flour. Once you grind the wheat berries into flour there is about a 1-2 year expiration before the oils in the flour go rancid. Now when you process flour into vital wheat gluten I would imagine that only speeds up the expiration of the flour.
Then you have to consider the majority of VWG is from non-organic wheat that has glyphosate. Glyphosate harms the digestive system and is found to increase inflammation in the body.
It is much simpler to find organic bread flour vs organic VWG.
For flavor and digestibility, I love making seitan from bread flour!
After simmering the seitan can you leave it the fridge or freezer for a few days or will that mess up the texture? I’m excited to try this recipe but I would need to make the seitan like 4 days in advance. Thanks!
It will be great in either the refrigerator or freezer, it shouldn’t affect the texture. I freeze my leftovers all the time with no issues!
Smoked yeast? Is that what it’s called? Looked like the Better than Bouillon brand but I couldn’t find a “smoked yeast” flavor
Smoked yeast is like nutritional yeast flakes, only its a different type of yeast that isn’t fortified and it’s smoked. I should have the product I used linked in the ingredients. That being said, it’s not required at all! You can sub in some smoked paprika or skip it all together. It helps add a depth of flavor with a slight smoky element
I just tried making this before Thanksgiving to see if I would like it.
I’m really sad to report I did not like it.
The broth was good but None of the flavors penetrated. The center of the roast was flavorless.
Did I do something wrong there? Texture was also rubbery and had more of a shellfish consistency.
The outer skin and the brother were really good. But I was disappointed with it. I’ve had very bad luck with seitan whether it’s WTF or VWG. I just can’t get it to taste good. I know others can so I don’t know what I’m doing wrong.
If the texture was too rubbery there is a chance you washed out too much of the starch. To make it more flavorful try rubbing the vegetarian chicken flavored bullion into the seitan as you knot it up. The flavors penetrate better if there is a little bit of starch left as gluten can be tough to blend seasonings into it.
Making seitan this method can take a little practice but it’s so rewarding once you perfect it! Next time rub in more seasonings/chix bullion before and as you knot up the loaf.
Excited to try, may i ask what smoked yeast is, like nutritional yeast or maybe like marmite? Sorry if english is bad.
Smoked yeast is like nutritional yeast flakes, just a slightly different flavor and it isn’t fortified. I should have a link to the product that I used in the ingredients section of the recipe
I never post on blogs but this got me. My biker carnivore husband and his biker carnivore friend tried your seitan. Response: not bad. I was shocked. I didn’t have some of the ingredients. Only nutritional yeast not smoked so i added liquid smoke. Also garlic powder, salt and pepper make everything taste good. Also, left out the mushrooms only because I didn’t feel like going to the store. The broth from the crockpot phase made great gravy. Thank you I will make this again.
Sorry, another issue: In the written process you say 5lb and 6 cup of water and then in the directions of the recipe, 5lb with 7 cup of water. I normally only read the recipe instructions, so now I am confused.
Good catch! I updated the article to match the recipe directions. That being said, the amount of water you use to hydrate the dough initially doesn’t matter too much. The goal is to get the flour hydrated enough where you can stretch and fold the dough to help build up the gluten network. Because the dough will be kneaded in water in the later steps the initial hydration of the dough doesn’t impact the final result. I go over this in my Youtube video if you want more detailed directions! Let me know if you have any other questions 🙂
I didn’t quite understand: how long to cook in broth, in a regular saucepan on the fire (probably medium)
And my oven heats up to a maximum of 250 degrees Celsius (your oven heats up to 350! Probably a professional one) how long in my case?
What is Vegetarian Chicken Bullion? I’m not the most proper vegetarian… can I use store-bought instant cubes to make broth?
In the US there’s a brand called ‘better than bullion’ that sells a vegetarian chicken flavored broth. That’s what I used! I believe some Asian grocery stores also sell vegetarian chicken flavored broth as well!
That being said, you can use a mushroom broth with garlic powder, onion powder, celery powder, and nutritional yeast and you will get a lovely chicken like flavor. Toss in some sage and thyme for more lovely flavor.
If you are cooking the seitan on the stove, you want it at a very low simmer. If the broth gets to a full boil then your seitan can get holes (from steam escaping) and that will result in a spongy texture. I’ve made seitan on the stove and do a 2 out of 10 for heat, it needs a long and slow simmer for the best texture!
Оps.! 350°F=180°С, sorry my fault!
This step isn’t the same as the video. Please clarify. Does it need to rest before adding the salt water and if it only rests 30-60 minutes, stretching and folding every 40 minutes???? Step 1 instruction: To make the dough and let it sit 30-60 minutes. You have the option to repeat stretching and folding every 40 minutes- this helps strengthen the gluten in your dough so you have a higher yield. It is completely optional and not required.
This is where the recipe is a little flexible. You can let the dough rest overnight in salt water or you can thoroughly knead it to have the gluten develop. Gluten can develop through a long resting time in salt water or it can be developed through stretches and folds or kneading it.
You can do both if you are inclined! I do recommend kneading it a little before covering it with the salt water, and you should wait to add the salt water until the dough has rested a bit.
Hope this clarifies things!