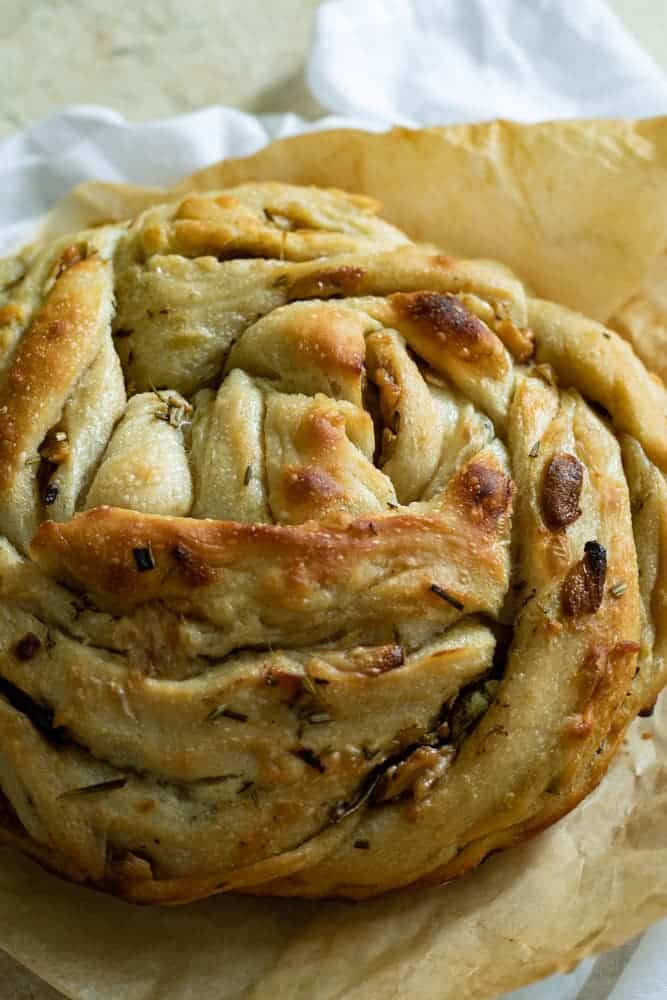
This is the sourdough bread for garlic lovers! This sourdough garlic twist bread pulls apart wonderfully and is loaded with five different kinds of garlic.
There’s a different garlic experience in each bite!
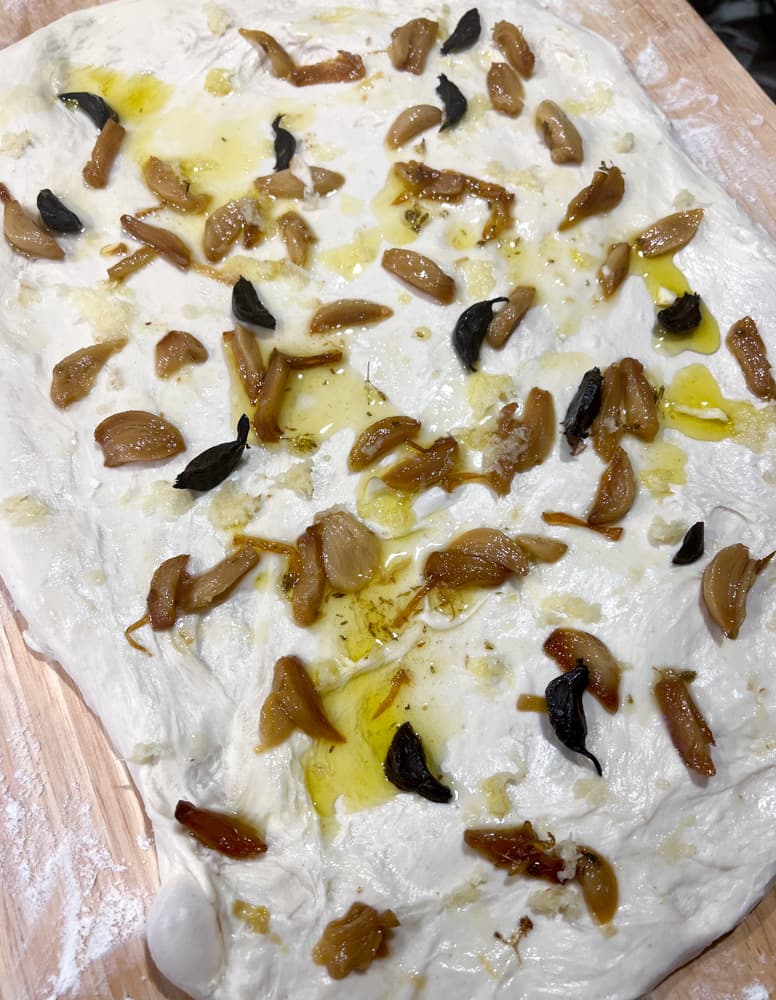
The sourdough bread is filled with garlic confit, grated raw garlic, sliced black garlic, garlic bolts, and sprinkled with roasted garlic granules. The sourdough gives you both a soft and chewy, crusty experience; this bread is a showstopper.

Garlic Sourdough Pull Apart Bread
This sourdough is a pull apart bread recipe where you braid the garlic filled dough and the ridges allow you to easily pull it apart. This makes this bread the best for dipping in soups or just snacking on!
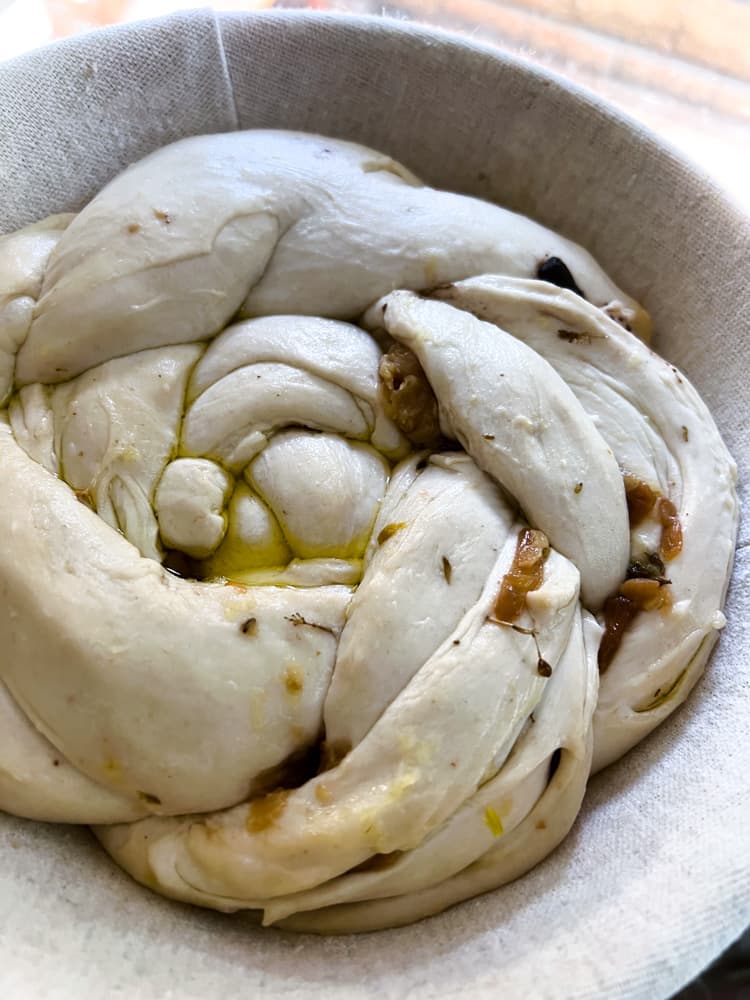
The oil from the garlic confit helps the layers of dough remain separated when you braid them together.
The process of braiding the dough is similar to Babaka or Challah- where you fill the dough, roll it, and then braid it. In order to braid the sourdough the hydration is at 70% (7/10 ratio of water to flour), this helps create a more workable dough that doesn’t blob out on us when we braid it.

Baking Sourdough Bread from Scratch
While this is a straightforward sourdough recipe, like all sourdough recipes, this takes time. You’ll want to feed your sourdough starter the night before you start assembling the dough. As you let your dough rise, you’ll make a garlic confit to fill the bread. This recipe takes two days to make – but is worth every second!
If you are looking for a quicker bread recipe, check out this Air Fryer Focaccia recipe that can be made in 1 1/2 hours. Another winning recipe is this 1-hour Banana Bread!
Ultimate Garlic Sourdough
Using multiple types of garlic really makes this bread special.
Black Garlic is incredible in this recipe as it has a deeper, richer flavor compared to raw or roasted garlic. Black garlic is aged and goes through a process that makes the antioxidants more available, making it ultra anti-inflammatory. The flavor of black garlic is what really makes this recipe stand out. The flavor of black garlic is like burnt caramel, figs, molasses, yet has that garlic flavor.
It can be found at Farmers Markets, International Grocery Stores, health food stores, and gourmet grocery stores.
If you become obsessed with it, consider making it!
All it takes is wrapping heads of garlic in foil, then leaving in a slow cooker or rice cooker under keep warm for 3 weeks.
Garlic Bolts are garlic greens that grow off of fresh garlic bulbs. If you come across a clove of garlic that has sprouted try planting it in soil. This will not only help you grow more garlic, but you can also harvest the greens! Those greens are called bolts- they taste just like the garlic clove! Chop them finely and use like green onions- only expect a garlic flavor. They are incredibly easy to grow! No worries if you don’t have any for this recipe- just stick with the other forms of garlic.
Garlic Confit is where you slow cook garlic in olive oil to make a soft, spreadable, version of garlic. While the dough is rising you will add in a head of garlic to olive oil and roast in the oven to add to the dough. When the garlic is slow cooked like this it sweetens in flavor and becomes ultra-creamy. When you take a bite of the bread the creamy garlic confit helps create a glorious mouthfeel. To add more dimension to this consider adding in other herbs like rosemary or oregano while cooking.
Grated Raw Garlic will add a slight sharpness and tanginess that really gives this bread an ultimate garlic flavor! It helps punch through the rest of the mellower garlic flavors and helps increase the complexity of garlic flavor. Only grate 1-2 cloves of the raw garlic, as this flavor really packs a punch!
Roasted Garlic Granules will add sweet mellow flavor that helps evenly disperse and wrap up the garlic flavor through the bread. You only need a small dusting of this. In a pinch you can use garlic powder in it’s place.

Baking Schedule
What to expect when making this recipe:
Feed your starter two nights before you want your bread.
The next morning, autolyze your Dough (Add Water to Flour).
Add Sourdough Starter and Salt to the Dough, and Fold the Dough roughly every 30 Minutes for 2 hours (4 times).
Let the dough rise for 4 hours.
Make the garlic confit by slow roasting garlic in olive oil for 1 hour.
Stretch out the dough, top with all the garlic, roll, braid, place in banneton and put in fridge overnight.
-The next morning, preheat the Dutch Oven and Bake.
That’s the quick and dirty of what to expect!
(Watch the video below to see exactly how to make it!)


Garlic Pull Apart Sourdough
Ingredients
- 420 Grams Water 2 Cups
- 600 Grams Bread Flour 4 1/4 Cups
- 90 Grams Sourdough Freshly fed and active sourdough starter
- 12 Grams Salt
Garlic Confit
Additional Garlic
- 1 Cloves Garlic
- 5 Cloves Black Garlic *Optional*
- 2 tsp Roasted Garlic Granules
- 2 tbs Chopped Garlic Bolts *Optional*
Instructions
- Start by feeding your sourdough starter so it is fully active- do this early in the morning or the night before
- Mix then knead the flour and water together until it is fully mixedLet rest for 45 minutes
- While you are letting the mixed flour and water rest do this:Preheat oven to 250FPeel the garlic and slice into smaller chunks, place in a small bake safe dish and cover with just enough olive oil that it is submerged
- Bake the garlic for 1 hour- then jar up with the oil and set aside
- While the garlic is baking in the oven do this:Stretch the flour and water mixture and fold in the sourdough starter and salt in incriminates until it is all folded and mixed inLet rest for another 30 minutes
- At every 30 minutes stretch and fold your dough about five times towards the center without tearing the dough. Repeat this process 4 times
- Let rest for 4-6 hours until it is puffy and risen (rise time depends on room temperature, cooler rooms need a longer rising time)
- Stretch out the dough into a thin rectangle
- Slice your cloves of black garlic into thirds and evenly spread over the surface of the dough,spread out the garlic confit (spoon the garlic out of the oil, try not to include too much oil)Grate your cloves of garlic over the dough evenlySprinkle the garlic powder over everything
- Roll the dough into a long tube
- At the end of the dough slice through the middle up to the top where you will leave roughly 3 inches, restuff any garlic that comes out
- Braid the two strains of dough together and tuck together into a round loaf
- Place in proofing basket and then put in the refrigerator for 12-16 hours (overnight)
- Preheat oven to 500FPlace Dutch Oven Pot into the heated oven for 30 Minutes
- Line the Heated Dutch Oven with parchment paper and place your loaf insideBake at 500 for 25 minutes with the lid on
- Reduce oven heat to 450 and remove the lid of the Dutch Oven and cook the bread for another 2-5 minutes or until it is caramelized on top and edges of golden brown.
Video
Notes
If pull apart bread isn’t your thing and you would rather have a garlic swirled loaf of sourdough follow these instructions.
Increase the amount of water to 480 grams rather than the 420 grams listed above. This will create a more sticky dough that will be extra fluffy (and jiggly!). This will help the various garlics blend into the dough better and will prevent the pull apart effect. Stretch the dough into a rectangle like above and use a dough scraper to roll the dough into a log. Split the rolled log of dough in half length wise and try to braid it. It will be messy and this does not need to be perfect. This helps distribute the garlic layers more easily- the layers will get lost as the dough congeals. Place the formed loaf into your bannet and let rise overnight. Before baking in the oven score the top of the bread loaf to help the bread release steam as it cooks.
Nutrition
Check Out More Recipes Here!
- Pumpkin Gnocchi Soup
- Vegan Labneh
- Miso Eggplant in the Air Fryer
- Stuffed Mini Jack o Lanterns
- Miso Mushroom Gravy
my dough is so wet, I wonder what I should have done differently. I am at the beach and its really humid, I think I should have used less water. I am going to try and save this and then I’ll let you know how it turns out.
Hii can I double check the timing with lid off please – 2-5minutes or a further 25 minutes?
Looking forward to making this 🙏🌟
After you bake the bread at 500F for 25 minutes, reduce the heat to 450F and then remove the lid. Then bake for an additional 2 to 5 minutes just to crisp up the top! If you have a spray bottle, spray the bread when you remove the lid and it creates a really nice crust