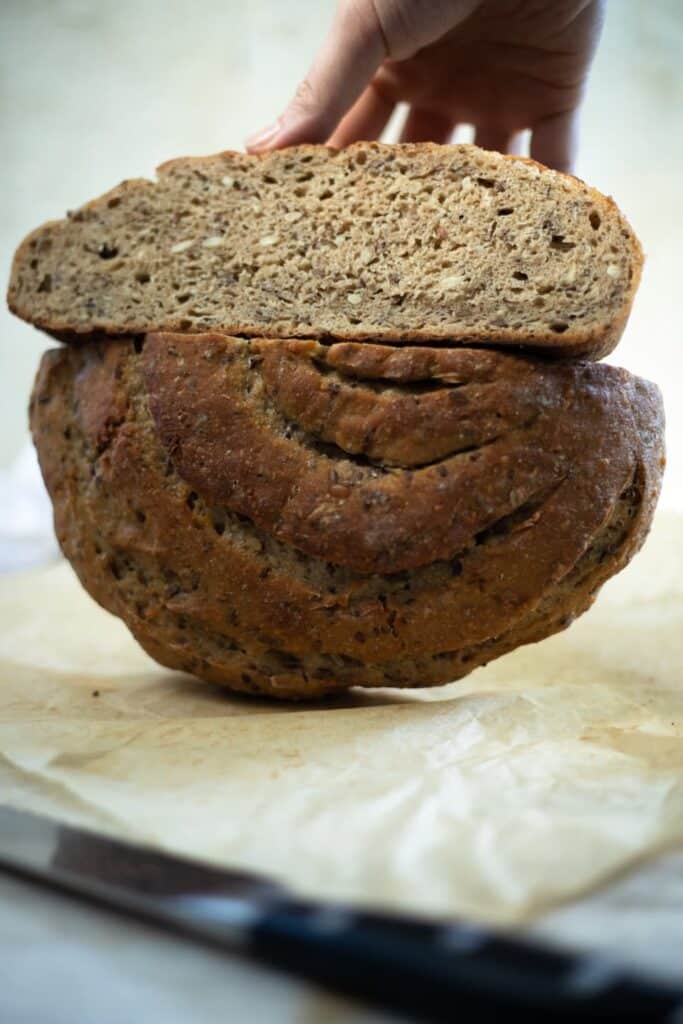
Seeded Rye Sourdough is a healthy, soft, and delicious bread that is perfect for fancy toast or gourmet sandwiches. This healthy bread gives you 73% of your daily value of omega 3 fatty acids, 70% of your daily value of manganese, 42% of your selenium, and it’s 9.5 grams of protein- in each slice!!! This bread is the perfect blend of delicious, soft, and nutrient dense.

Sourdough – The Healthier Bread
This is the ultimate sandwich bread and the perfect base for fancy toast! This bread is a staple recipe for my household since it is so nutrient dense and is so tasty. While sourdough does take longer to bake compared to yeast bread there are many health benefits to sourdough that really make it worth it.
- It improves your digestive health. Sourdough acts as a prebiotic that helps feed the good bacteria in your gut. It also contains less gluten and studies have shown that sourdough bread doesn’t affect people with gluten intolerance!
- The lactic acid in sourdough helps your body absorb the antioxidants and nutrients from the bread– another reason to love fermented foods in general!
- Because sourdough helps you absorb antioxidants and nutrients better it can help you prevent disease!
- Sourdough can help manage your blood sugar– the lactic acid helps reduce the availability of simple carbohydrates, meaning less blood sugar spikes!

What You Need to Bake Sourdough
Baking sourdough bread at home does require some specialized equipment.
Nothing expensive or fancy is needed but to help the process a dough hook is very useful. A dough hook helps mix the flour and water together when you are first making the dough. The dough is very sticky and it works much better than a wooden spoon or spatula.
You’ll want a banneton. It’s a proofing basket for the dough that helps keep the dough’s shape while it’s proofing.
A Kitchen Scale. Sourdough baking is an exact science and you’ll have more consistency if you weigh your ingredients rather than using measuring spoons.
A Dutch oven. A Dutch oven with a lid helps keep the moisture in while you bake your sourdough. This is a kind of large, deep metal pot.
A spray bottle – spraying the bread while it bakes will help give you a crustier bread
How to Make Sourdough
To make this loaf of sourdough you’ll need to start by feeding your sourdough starter. A strong starter will help ensure a fluffy rise.
To feed your starter, discard all of it from your jar- leaving some scraps inside. Then add equal parts flour to water. To create a stronger starter, add whole wheat flour and rye flour in addition to your all-purpose flour to really feed your starter.
The next step is to autolyze your dough by adding the flour to water, mixing it with your dough hook, then letting it rest. This will help build up your gluten structure so you will have a taller, more fluffy loaf.
After the dough has rested for about 45 minutes, you’ll measure out the starter, salt, seeds, and molasses. You’ll want to slowly add these to the dough in increments. Start by spreading about 1/5th the starter, salt, seeds, and molasses over the dough- then fold it in. Repeat this process 4 more times until everything is used up and distributed throughout the dough.
From here you will stretch and fold the dough towards the center. This stretching and folding process helps create the structure for the gluten. Carefully fold the dough towards the center without tearing it. Do this every 30 minutes, about 4 times.
Then you let the dough rest 4-6 hours or until the dough has risen about 30%. You don’t want the dough to double that will leave it over proved and will give you a denser bread. The time that it will take for it to rise about 30% varies depending on the temperature of the room. If you are doing summer baking aim for about 4 hours, if it’s cold in your home you may need up to 6 hours.
After the dough is puffy, you’ll pour it out onto a floured surface and shape the dough into a loaf. Then set it inside of your prepared banneton basket and pop it in the refrigerator overnight. This is very important as this is when the dough ferments!
The next morning you’ll preheat your oven to 500 degrees with your Dutch oven inside the oven, with the Dutch oven remaining empty. You want the Dutch oven piping hot so you will need to heat it in the oven before you add your dough.
While the Dutch oven heats up, you’ll score the top of your dough to help the bread release steam. Then you’ll line the hot Dutch oven with parchment paper and add the dough to bake.
Bake the bread for 20 minutes before you turn down the heat to 450; at this point you’ll remove the Dutch oven lid so the bread crust can caramelize. Spray it with water to really help that crust get extra crispy!
When getting the crust to caramelize the bottom of the bread can get overcooked. A trick to prevent this is to place a baking sheet underneath the Dutch Oven to help prevent burning.
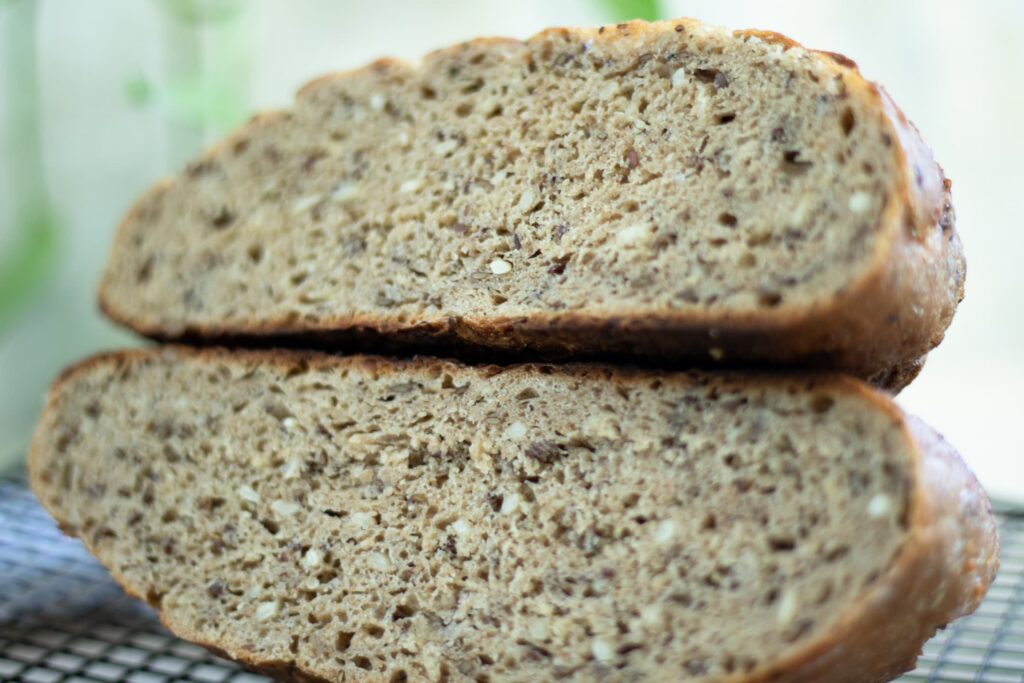
After the bread is done baking let it fully cool before slicing into it- this will help ensure the bread stays moist for longer!
Looking for more Bread Recipes?


This loaf of garlic bread is loaded with 5 different kinds of garlic, garlic confit, grated raw garlic, roasted garlic granules, black garlic, and chopped garlic bolts. This is the bread for the garlic lover!
What to Make with Seeded Rye Sourdough Bread
This bread is the perfect base for any sandwich! Thinly slice it and load it up with your favorite fillings. Fancy toast or an open-faced sandwich is another great option.
Try these toast ideas for a quick and healthy breakfast!
Toast ideas:
- Olive Oil, Nutritional Yeast Flakes, Black Pepper, Garlic Powder, Pinch of Salt
- Garlic Confit, Sundried Tomatoes, Fresh Basil
- Sliced Tomatoes, Black Pepper, Basil, Balsamic Vinegar, Fresh Basil
- Garlic Hummus, Roasted Red Pepper, Chili Oil, Green Onions
Seeded Rye Sourdough
Equipment
- Large Bowl
- Silicone Baking Mat
Ingredients
- 420 Grams Bread Flour
- 180 Grams Rye Flour
- 480 Grams Water
- 90 Grams Sourdough Starter Freshly Fed
- 12 Grams Salt
- 1 tbs Black Strap Molasses
- 3 tbs Flax Seeds
- 3 tbs Hemp Seeds
- 3 tbs Sunflower Seeds
Instructions
- Day 1 – The night before making your dough, feed your starter so it will grow overnight.Do with equal parts (50 grams each) flour and water
- Day 2 – Measure out the flours and water, using a dough hook to mix together until combined. This will make a shaggy dough. Let it rest for 1 hour
- Measure out your active sourdough starter, salt, seeds, and Molasses
- Add in roughly 1/5 of your sourdough starter, salt, seeds and molasses to the dough, fold in. Repeat the process of adding the starter, salt, and seeds to the dough, and folding it in until everything is used up.
- Let rest for 30 minutes, then fold the dough every 30 minutes 4 times
- Leave your dough in the bowl at room temperature for 4-6 hours (depending on room temperature) until the dough rises about 50%
- Remove the dough from the bowl and reshape it by gently folding it into a loaf
- Place in a prepared banneton basket, and refrigerate overnight (at least 12 hours or up to 24 hours)
- Day 3 – Place your Dutch oven in the oven and preheat the oven to 500FBake the Dutch oven for 30 minutes
- While your Dutch oven is heating up remove your dough from the refrigerator and score the top of it. Use whatever design you prefer!
- Remove the Dutch oven from the oven, line with parchment paper or a silicone baking matPlace dough in the lined Dutch oven and bake for 20 minutes
- Lower the oven temperature to 450FRemove the lid of the Dutch oven, spray the dough with fresh waterBake for 3-7 minutes or until the crust is golden brown
Nutrition
Looking for more Inspiration?
Here’s the latest!
- Easy Seitan Chicken
- Sourdough Baguette
- Stuffed Seitan Turkey
- Wheat Starch Pancakes
- Okara Veggie Burgers