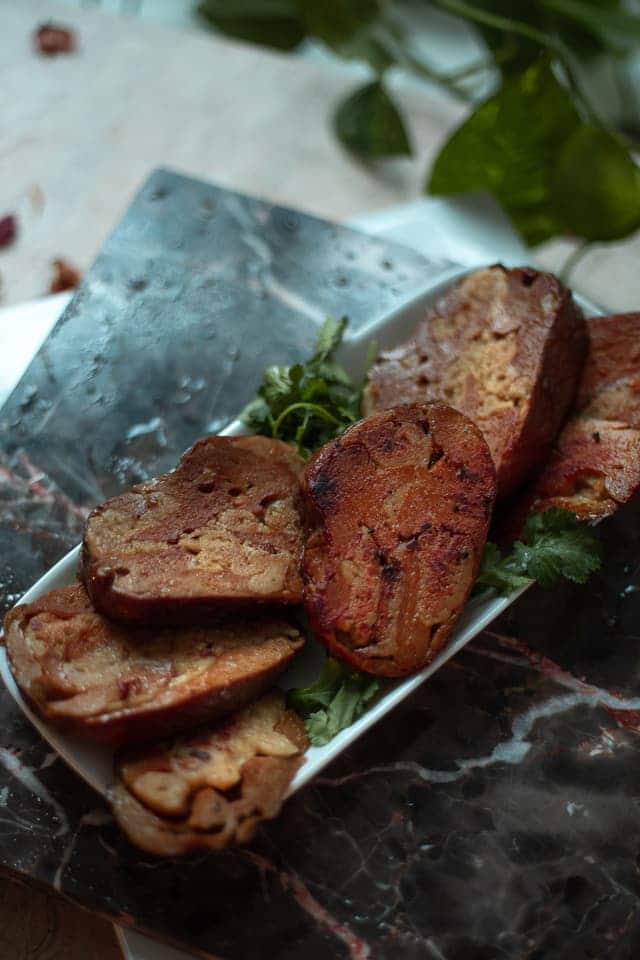
This Seitan Beef Steak is made extra tender and meaty by using seitan made from washed bread flour. This recipe creates a succulent steak with ribbons of fat that still shreds.
The meaty yet juicy texture is created from dipping strands of seitan in a starch “fat” sauce, then is laid out into a roast shape, being held together by a seitan skin. The steps for this recipe are intensive but create the best seitan steak recipe.
This is the recipe for you if you want a vegan steak with ribbons of fat, a chewy yet delicate bite that is reminiscent of veal where it is meaty yet quite tender.
Unlike other seitan steak recipes that use vital wheat gluten, the recipe has an improved flavor and texture thanks to the “wash the flour” method. It’s also much easier to digest seitan that has been flour washed compared to using straight up vital wheat gluten – It’s a game changer! Once you master washing the flour it’s hard to go back to using vital wheat gluten.
What To Serve with Your Seitan Steaks
You could sear these seitan steaks on the grill and pair them with roasted garlic potatoes, some roasted butternut squash, or some air fried brussels sprouts.
Another fun option is to slice them up, fry in some taco seasoning and toss into some enchiladas!
I personally LOVE these steaks tossed in a ginger garlic sauce and topped over pho or ramen.
There are so many options to use these vegan beef steaks!
Use it in any omni recipe in place of steak- which is why it’s really nice to have on hand at all times. It’s so versatile.
Consider making a double batch so you have plenty leftover to freeze. Having some frozen seitan that’s ready to go is a great way to meal prep; simply thaw it out before cooking!
Why would a vegan want veal-like steak?
For the animals, for improved health, and to help the environment. You can care about those things and still be a foodie!
Veal-making is an incredibly cruel process. Sentient creatures should not be slaughtered for palate pleasure- they have thoughts, feelings, and want to live like any other being. While humans might be the current apex species on Earth, we shouldn’t bully and harm other weaker beings for our pleasure.
Beef is not good for your health, is associated with heart disease and diabetes, and regular consumption can increase your cancer risk.
Cows produce 14% of the human caused emissions that is causing climate change, not to mention that “production of livestock accounts for 30% of land use globally“. Forests are being clear cut for cow pastures, while yet another issue is the amount of soy and corn that is grown to feed the cows – enough to feed the whole planet’s humans on its own!
Eating a plant-based diet is the best way we can help fight climate change at an individual level.
This recipe on the other hand is high in protein, low in fat (just enough to keep things juicy) and tastes incredible.
Succulent seitan steaks offer an incredible mouthfeel that even an omnivore would love!
How to Assemble the Seitan Steaks
Below is a step-by-step guide how to make these beef seitan steaks. Scroll down to see photo direction!
Forming Your Vegan Beef
Start by making your dough ball using a bread flour for its high protein content. Knead the dough until it is very elastic and smooth; when you poke it, the dough should bounce back. This should take about 10 minutes of kneading.
Then you let it rest in salt water to help the dough develop those gluten strands. The salt helps the starch separate from the gluten giving you a higher yield. Often some gluten will wash away with the starch if it hasn’t fully developed, giving you a smaller seitan dough ball. This is why kneading it thoroughly and giving it a long rest in salt water is so important. While you can still create a seitan dough without letting it rest for 3 hours you will have a smaller result.
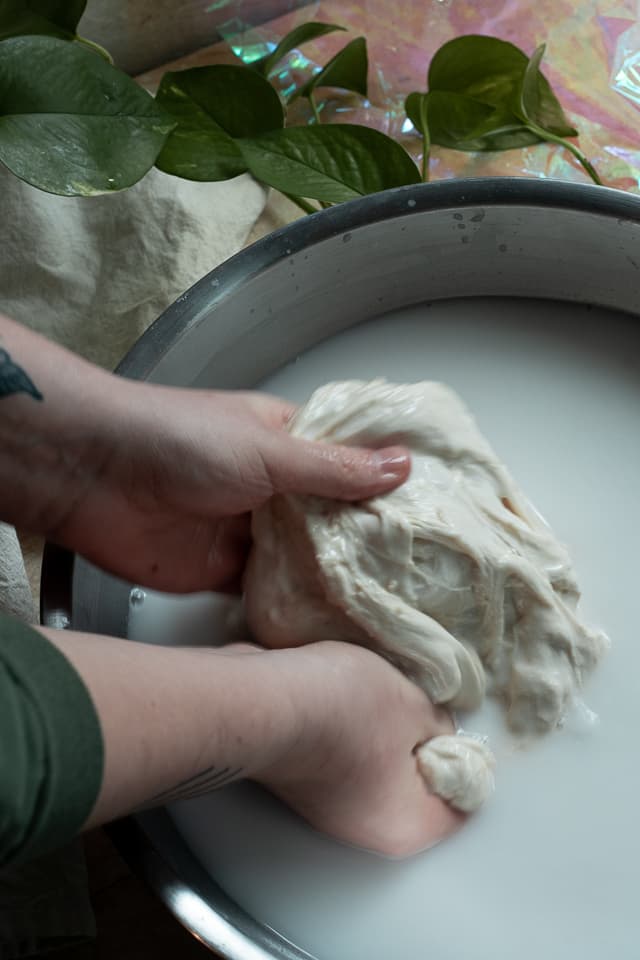
After your dough as rested, drain out the salt water and replace it with fresh water. Start kneading the dough in the fresh water. You’ll notice the water will become milky and cloudy. Continue to knead the dough until the water is thick with the starch and set the starchy water aside in a separate bowl. Continue to wash the dough in more fresh water, changing out the water (don’t keep the water after the first bowl of starchy water), until it is coming out almost clear.
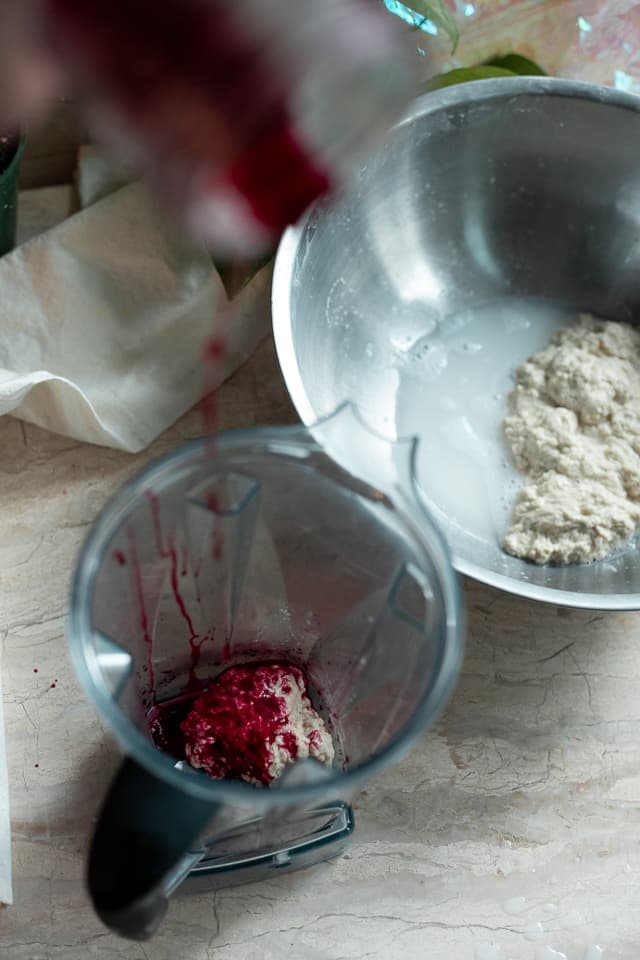
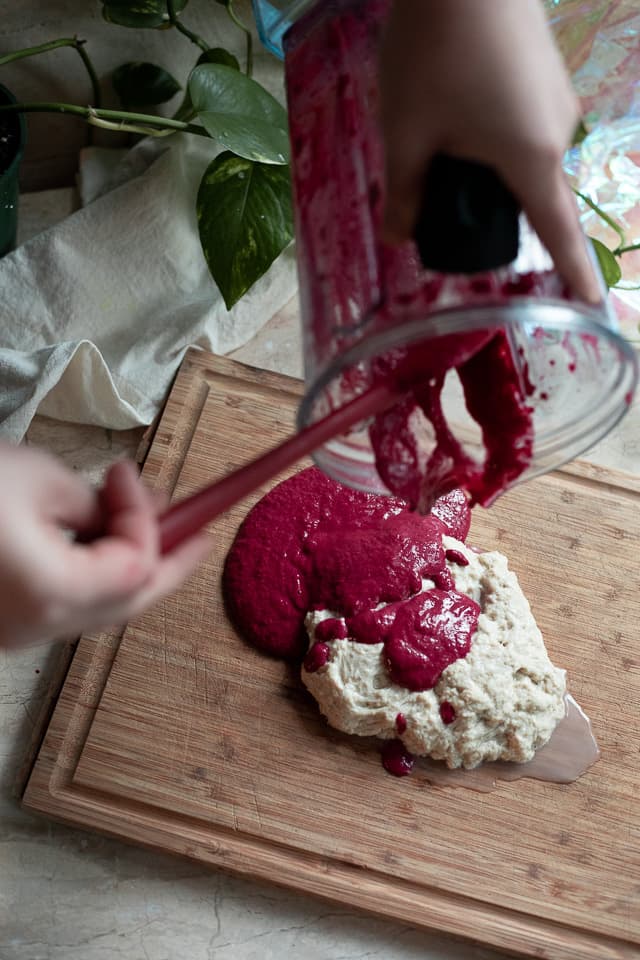
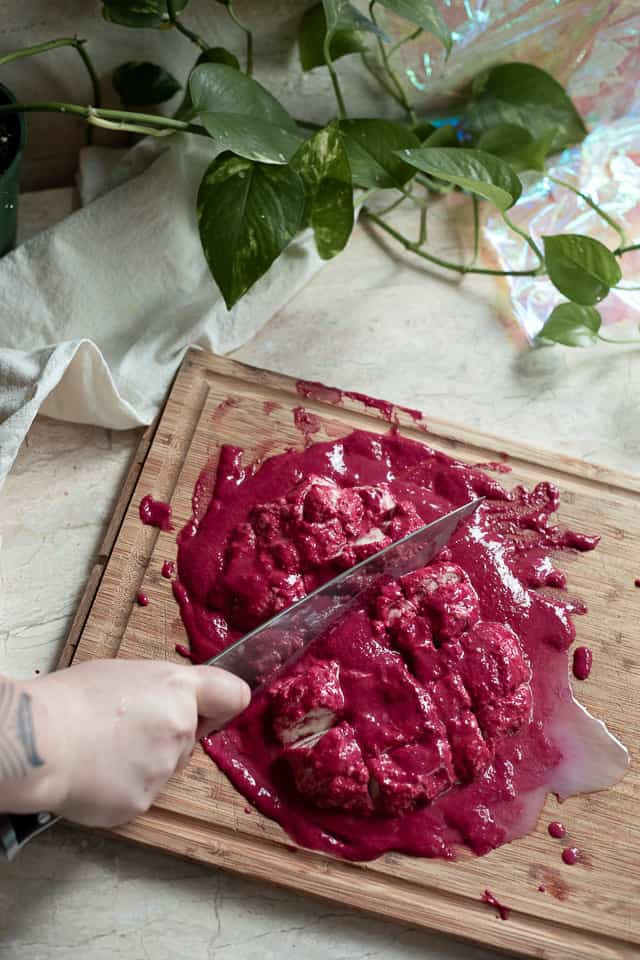
Then take a 1/4 chunk of the seitan dough and put it in a food processor or blender. Add in the seasoning, food dye, or beet chunk and mix until incorporated. Then pour that mixture over the rest of the seitan dough. Using a knife chop the mixture in, knead, chop, knead until it is uniformly one color.
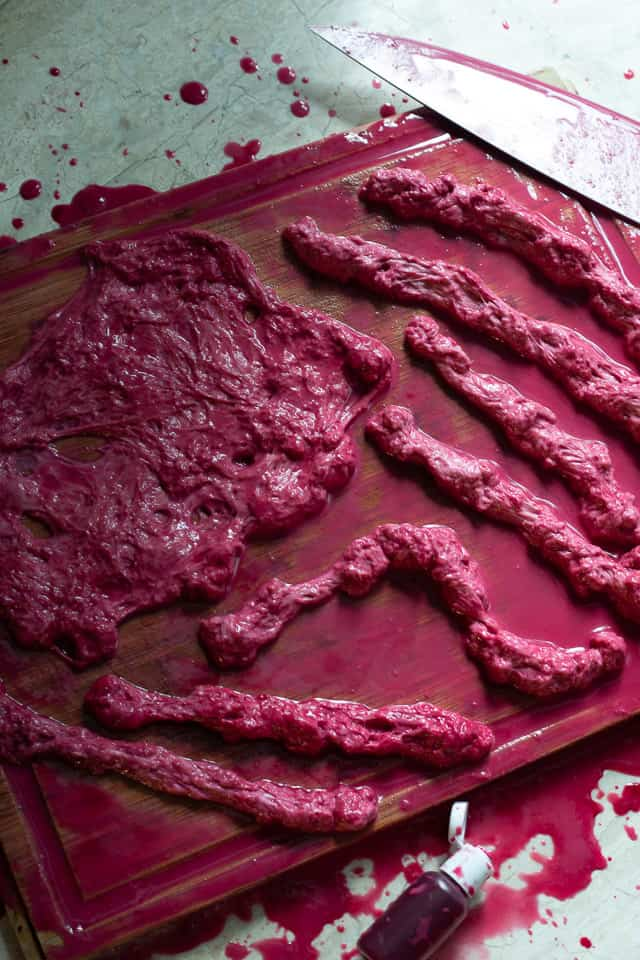
Then take 1/3 of the seasoned seitan, flatten and stretch it out to be about 6 inches across. Separate the remaining seasoned seitan into long thin strips. They do not need to be even but have them be long enough to drape over your bowl. Create 7-9 strips; each strip will create a layer and improve the texture of the steak.
Take the starch water you set aside from when you washed your dough ball. Pour off the excess water off the top, as you’ll notice the starch sinks and the water floats. After you’ve poured off most of the excess water (some water on top is fine), whisk it up so it is an even consistency. Measure out 1 cup of the starch water and then add your other fat sauce seasonings and the methylcellulose.
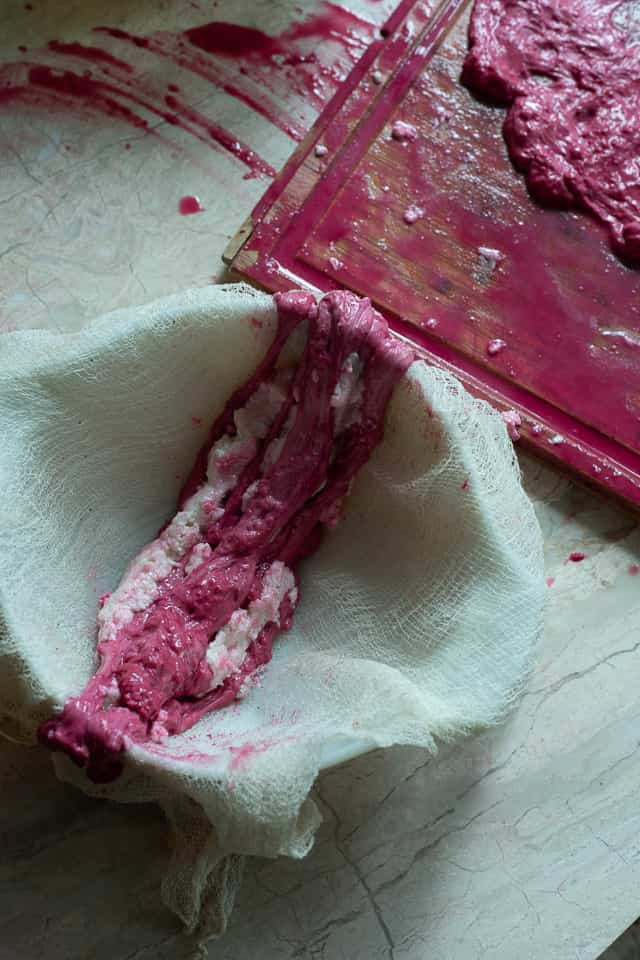
In another bowl, lay out some cheese cloth, then dip the strands of seitan dough into the fat sauce, then lay it in the bowl. Lay each strand in the same direction, then fold them in to create a loaf. Carefully place the ball over the flattened seitan and wrap the seitan around the ball to encase it.
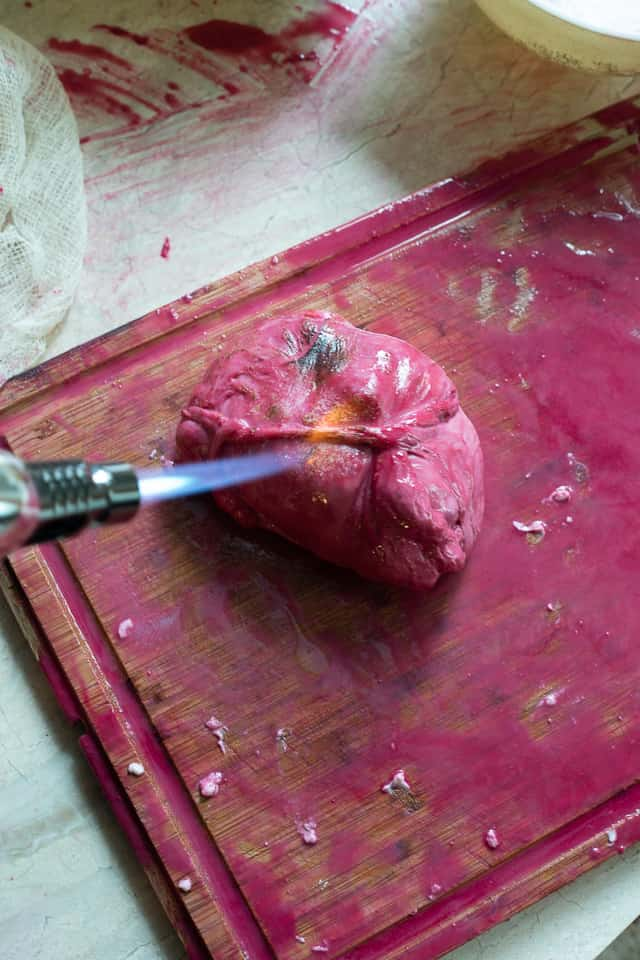
Then, using a blow torch, roast the exterior of the seitan. This will help prevent the fat sauce from leaking too much (there will be some leakage), and it creates a skin for the seitan.
Simmering the Seitan Beef Steaks
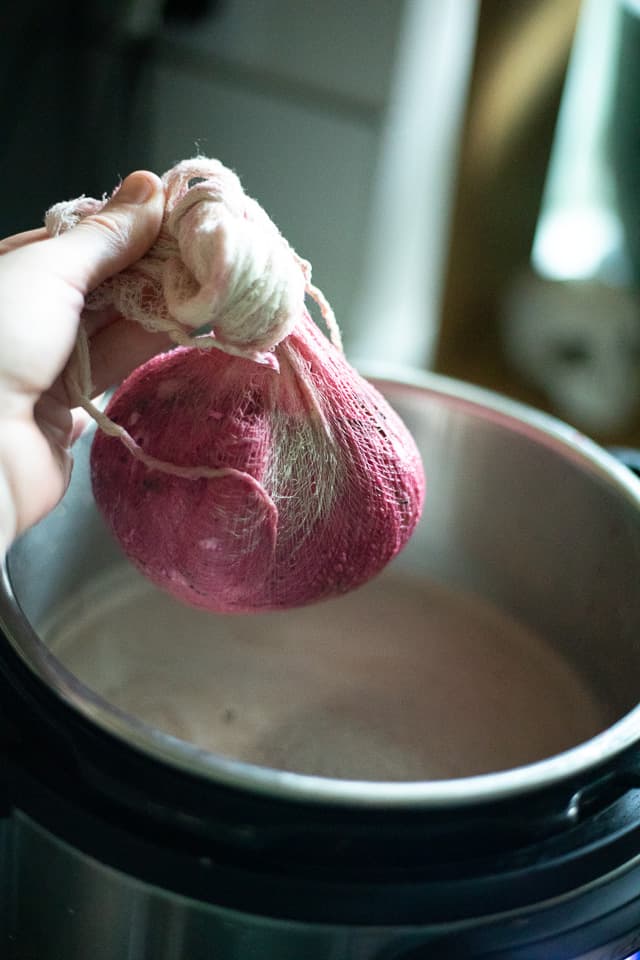
Very tightly wrap the seitan in cheesecloth. If it is not wrapped tightly the dough ball will expand and the result will be doughy.
Then you want to simmer the seitan for at least 3 hours.
The best seitan steaks need a low temperature, and a long cook time. You can’t really overcook seitan when it’s simmering even if you forget about it overnight. However, if the temperature of the broth is too high you will get air pockets and a spongy seitan. This is why a slow cooker is recommended, it’s the best way to control the temperature over a long period of time. You can certainly simmer the seitan over the stove, but you must watch the bubbles. It needs to be barely bubbling at the lowest simmer possible.
After the first simmer is done, let the seitan rest overnight. This helps it firm up and develop the best texture. Save the beefy broth from simmering as you will need it the next day.
The next day remove the seitan from the cheese cloth. Then slice the loaf into about 1 inch slices. Then simmer the slices in the same beef broth from the day before for 1 hour, ensuring the center of each steak is properly cooked and is no longer dough.
Serving Seitan Steaks
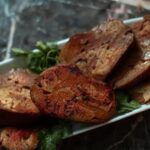
Before serving the seitan steaks you will want to pan fry or grill them. Treat the simmered steaks like uncooked meat – it needs to get crisped up. While you could technically eat it straight out of the slow cooker, it will be much more enjoyable fried up a little.


WTF Beefy Seitan Steaks
Equipment
- Blow Torch Optional- helps create a tougher 'skin' for the seitan
- Stand Mixer Optional – so you don't have to hand knead
- Blender Optional
- Food Processor Optional
- Slow Cooker Optional
- Instant Pot Optional
Ingredients
Basic Dough
- 6 Cups Bread Flour
- 2 Cups Water
- 4 tbs Beet Powder Or red food coloring
Meaty Seasonings
- 2 tbs Beet Powder Or beet juice, and/ or additional red food coloring
- 1 tbs Black Strap Molasses
- 1 tbs Miso Red Miso if possible
- 1 tbs Mushroom Seasoning or Ground Mushroom Powder
- 2 tsp Tarmari or Soy Sauce
- 1 tbs Nutrional Yeast Flakes Try Smoked Torula Yeast
- 1 tsp Smoked Paprika
- 1 tsp Garlic Powder
- 1 tsp Onion Powder
- 1/2 tsp Liquid Iron Optional, adds a bloodier taste
Fat Sauce
- 1 Cup Starch Water Reserved from Flour Washing the dough
- 2 tbs Coconut Oil Melted
- 1 tbs Mushroom Seasoning
- 2 tsp Methylcellulose Optional, Adds Firmness
Simmering Broth
- 8 Cups Beefy Broth Either homemade vegan beef broth or store bought
- 2 feet Cheese Cloth
Instructions
Flour Washed Seitan Dough
- Knead the flour and water for six to ten minutes by hand or for 4 minutes on speed 2 with a dough hook in a standing mixer. You want an elastic dough that bounces when you press on it, where it is nice and smooth
- Place dough ball in a large bowl and cover with salted water. Add about 3 tbs of salt to the water to make it very salty- this helps separate the starch from the gluten. Let the dough ball rest under the water for at least 3 hours- or allow it to rest overnight. A longer resting time helps the starch separate from the gluten easier.
- Drain the water and replace it with fresh water in your large bowl. Begin kneading the dough under the water, the water will start to become cloudy and the dough ball will begin to feel gummy. Continue to knead the dough until the water is completely cloudy. Pour the starchy water (the cloudy water) into a large jar to save.
- Add more water to your bowl and continue to knead the dough until the water is completely cloudy again, pour out the starchy water and save it. See in the notes for other recipe suggestions on how to use the starch
- Again add more water to your bowl and knead, you want the gummy dough to be almost clear under the water where almost all the starch is washed out
- Take 1/4 of the dough and add it to a food processor or blender. Add in all the meaty seasonings and then blend until incorporated. It will create a batter
- Pour the batter over the rest of the dough and begin alternating between chopping the dough and kneading it. Chopping the dough helps incorporate it better. Knead until the dough is one uniform pink color.
- Separate the dough into 10 pieces, stretch out 8 chunks into long strands.
- Take the two remaining pieces and knead together then flatten and stretch into about a 6 inch sheet
- Set aside while you create the fat ribbons
Fat Sauce
- At this point the water and starch has begun to separate, pour off the excess water off the top. The longer you let the starch water rest, the more separation will occur. After you pour off the water from the top shake the jar well; the thickest starch will have settled to the bottom of the jar.
- Measure out 1 cup of the starch water and add it to the blender with the rest of the oil and mushroom seasoning
- Blend until incorporated and then pour into a bowl
Assembling the Succulent Seitan Roast
- In a medium sized bowl lay out cheese cloth
- Lay a strand of the seitan dough, then take another strand of the dough, dip it in the fat sauce, and lay it next to the other strand going in the same direction. Repeat alternating dipping the strands and laying them over and next to each other until you laid out all the strands. Fold the ends of the strips inwards to create a loaf shape
- Place rolled out seitan sheet next to you. Using the cheese cloth lift out the Seitan loaf and flip it onto the seitan sheet. Grab the edges of the seitan sheet and tuck it over the loaf, so the sheet of seitan is encasing the laid-out seitan strips.
- Brush your oil over your seitan loaf
- Using a blow torch, sear the exterior until it is dark brown and bubbles all the way around. Be very gentle turning and flipping the loaf as you want minimal tearing in the thin outer layer of seitan covering the inner seitan loaf.
- Place the loaf into the cheese cloth and wrap it very tightly. If you do not wrap it tightly the seitan will expand and be doughy in texture.
Simmer
- Add 8 cups beefy broth to any of these (enough broth to fully submerge the seitan)
- For Instant Pot: Place wrapped seitan in the instant pot and put on the Slow Cook Setting on High. Have the cheese cloth stick out through the lid to prevent the Instant Pot from fully sealing. Leave the pressure valve open so it does not seal. If the IP seals the broth could get too hot and create air pockets in the seitan. This will result in a spongy seitan filled with holes. Cook for 2 hours
- For Slow Cooker: Place wrapped seitan in the slow cooker that is filled with broth. Cook on regular heat for 2 hours
- For On the Stove: Bring the broth to a low simmer and add the wrapped seitan. Keep the simmer so low that it barely bubbles- this will prevent the broth from getting too hot and creating air pockets in the seitan., which will result in a spongy seitan filled with holes. Cook for 2 hours
- Save your beefy broth for the next simmer!
Rest
- Remove the seitan from the cheesecloth
- With a blow torch, roast the exterior to your liking
- Brush on Coconut Oil
- Let rest for at least 2 hours, ideally let it rest overnight
Slice and Fry
- Gently slice the roast into 1-2 inch segments to create a thick steak
- Heat a frying pan with a generous amount of oil on high, fry each of the steaks for about 2-3 minutes on each side
Simmer
- Using the same broth from the previous simmer, once again bring to a simmer using your preferred method. This step really locks in the flavor for the seitan, consider adding more of the 'meaty seasonings' that was used in the dough to the broth. Taste it as you season so your broth is flavorful and absolute perfection.
- Simmer your sliced seitan steaks for 2 hours
To Serve
- Treat your seitan at this stage like under-cooked meat. It's edible, but this is the perfect time to grill it or pan fry it to serve. You could eat it without pan frying but then it'll lack any crisp, which is a nice textural addition. Another option is to break it up with its natural shreds, season it, and oven roast it for beefy steak sandwiches.The seitan will store in the fridge for up to a week and up to 4 months in the freezer.
Notes
- If you don’t have a blender or food processor follow these steps.
1. Mix together all the meaty seasonings into a paste and rub it over all the seitan.
2. Using a knife repeatedly chop the seitan, knead, and continue to chop.
3. Repeat this process of chopping and kneading until all the spices are incorporated. - Liquid iron can be found at health food stores or ordered online. Adding Liquid Iron adds a bloody taste, especially since iron is concentrated in blood. Since beef is typically bloody, adding iron (and iron rich ingredients) helps replicate the flavor. Adding this will add color and make your steaks a darker brown.
- Not sure whether to use food coloring or beet powder? Beet powder is all natural and not only adds a pink hue to your steak, but it also helps add depth in flavor. It isn’t as powerful as food coloring, especially if you add liquid iron. Part of making an incredible tasting plant meat is making it look visually appealing and look like the food you are trying to replicate in taste. You won’t want to skip it- you’ll want to do one or the other, or both.
There isn’t a way to calculate the Nutrional Information of the flour using my current program since we washed away the starch from the gluten. Since the starch is sugar/ carbs, the calories, carbs, and sugar will read higher than what it actually is.
Nutrition
Hungry for more?
Check out the latest recipes here
- Easy Seitan Chicken
- Sourdough Baguette
- Stuffed Seitan Turkey
- Wheat Starch Pancakes
- Okara Veggie Burgers