This high protein recipe is so meaty and some of the best plant-based BBQ ever!
These bbq boneless wings are made from flour washed seitan- making this a great budget recipe since it is made from bread flour.
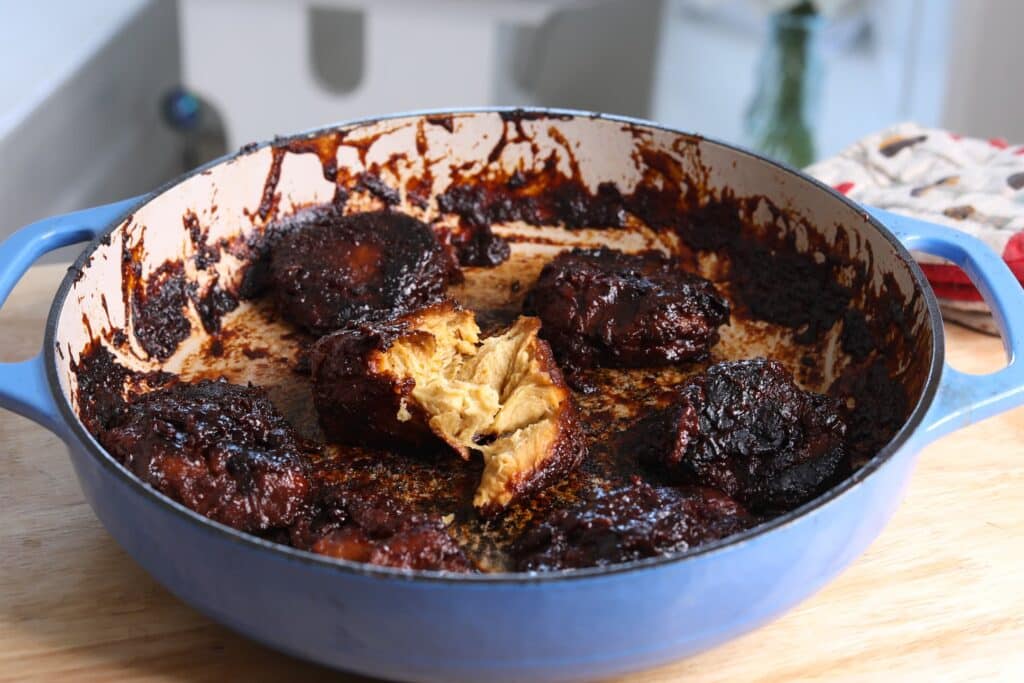
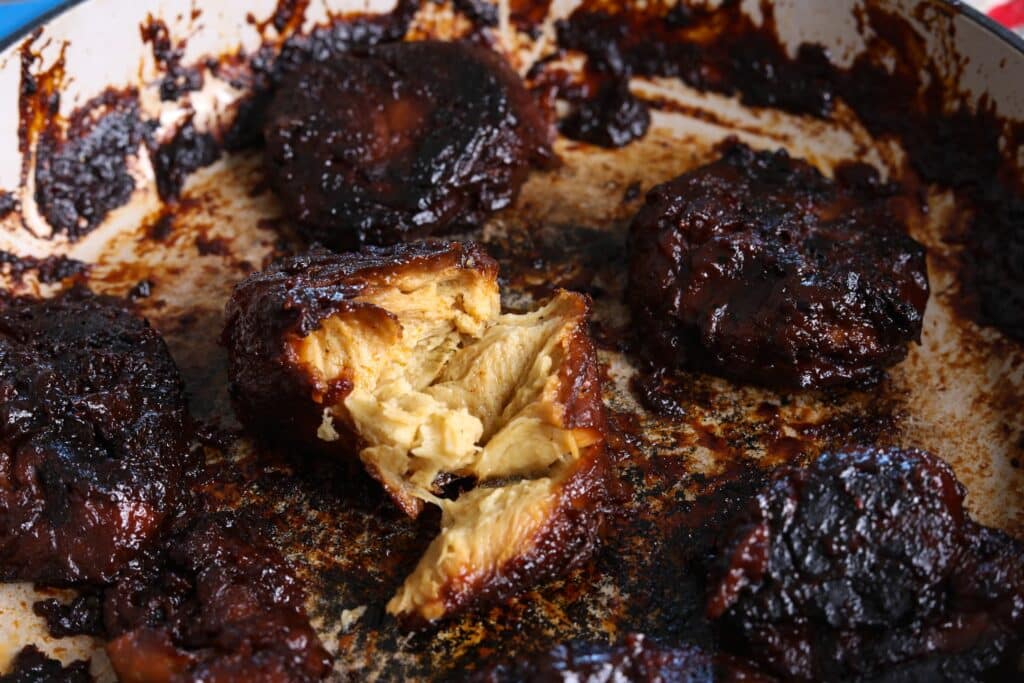
It shreds like chicken, has the same mouthfeel- but this has a powerful bbq flavor that will leave you wanting more!
When I first started cutting out animal products from my diet it was because I wanted to help reduce animal suffering and help the environment. I was raised eating chickens, cows, and other animals. My grandparents were farmers in Minnesota after all. While I enjoyed the flavors of meat, when I learned that I could live longer on a plant-based diet I knew I needed to stop. I don’t think it’s right for an animal to suffer for pallet pleasure.
Since I went vegetarian, then vegan almost two decades ago, I have been on a mission to create the best tasting vegan proteins. I love the taste of bbq chicken- and with this recipe, I was able to replicate that. No animals harmed.
Many plant-based people will use vital wheat gluten to create their seitan. I used to make seitan that way, even on this blog you’ll find an old vegan chicken recipe using vital wheat gluten.
However, I’ve found you get a much better flavor when you make seitan from bread flour rather than vital wheat gluten.
Not only does it taste much better, but it is much easier to digest. Not to mention that bread flour is much cheaper than Vital Wheat Gluten too.
How to Make Seitan Wings Overview
I’m going to start by saying I made a detailed youtube video on how to do this if you want to watch the process!
The process to make these seitan wings is to start by flour washing. That is where you take a high protein bread flour and create a ball of dough, then you wash out the starch from the dough. Flour is made up of starch and gluten, or carbs and protein. When you remove the starch from the dough you are left with pure protein.
Flour isn’t automatically gluten- gluten is a product of flour that needs to be developed.
Time is the best way to develop gluten.
Think of no knead recipes you see online- they only work because gluten was formed from an overnight rest. You can develop gluten by kneading it, however it is more effective and simpler to give it more rest time.
If you rush this recipe you risk having a soft doughy textured seitan!
For a firm and meaty result you need to have patience.
Once you’ve created your gluten, you season the dough, fry it, then simmer it. For the best result simmer the seitan for 24 hours. That being said, I had success simmering it overnight for about 12 hours and then baking it. However the seitan was a bit soft compared to the seitan that cooked for 24 hours. The flavor was incredible though!
The last step is to bake the simmered seitan in bbq sauce before serving! I imagine this would be incredible over the grill in place of an oven- please let me know if you try that!
Schedule for BBQ Seitan Wings
- Day 1, in the evening- Create dough ball and leave in salted water overnight
- Day 2, in the morning or afternoon pour out the salted water and wash the flour. Season it, shape it, and fry it. Place in slow cooker/ instant pot let cook 12-24 hours
- Day 3, If seitan is soft, let rest in refrigerator. If it is firm, skip that step and continue
- Day 4, fry the seitan, cover in BBQ sauce, and bake in oven
Step 1: Form the Dough
This recipe starts with you creating a ball of dough using bread flour. You can make this recipe using All Purpose Flour, however it will be more difficult. That is because all purpose flour is higher in starch and lower in protein. That means you’ll have to wash out more starch from the dough and be left with a smaller yield of gluten.
Stick with bread flour if you can! For those of you who are gluten free, this recipe will not work with a non wheat flour. Gluten is wheat protein, and other flours don’t have the protein to hold a structure to make a seitan.
Once you have your ball of dough formed you have the option to do some stretches and folds like when making sourdough- this is another way you can help develop your gluten and increase your yeild.
Then you do an overnight rest. To prevent the dough from drying out cover it in water. Add salt to the water- the salt helps strengthen the gluten.
The salt will not make your seitan salty- it will be washed out.
The salt is helpful in this stage because
1. Salt enhances the hydration of gluten proteins, which makes them more elastic and cohesive
2. Salt reduces the free sulfhydryl groups (SH) in gluten proteins, which are responsible for breaking and reforming disulfide bonds (S-S) that link different protein chains together. This means that salt stabilizes the gluten network and prevents it from breaking down easily.
3. Salt increases the beta-sheet structure of gluten proteins, which is a type of secondary structure that gives them strength and rigidity
4. Salt promotes the macromolecular aggregation of gluten proteins, which means that they form larger complexes with each other.
Flour Washing the Seitan
After you’ve let your seitan rest overnight pour out the salty water the dough was soaking in.
Add cold water to your large bowl and begin to gently knead the dough. Be gentle to not tear the dough. You’ll notice the water will become thick and white- that is the starch separating from the dough. You can save the starch water by pouring it into jars. You can use wheat starch just as you would with other starches. It can be used to make noodles or thicken sauces.
Repeat dumping out the starch water and replacing it with more cold water and continue to knead the dough until the water comes out clear.
Seasoning and Forming the Vegan Wings
At this point you’ll want to stretch out your dough into a big rectangle and sprinkle over your seasonings. Using nutritional yeast flakes helps add amnio acids that gives the seitan a depth of flavor that helps it taste meatier. Adding some mushroom seasoning helps add natural glutamates that gives it a mouth watering flavor.
Adding some BBQ seasoning really helps the seitan get that flavor really locked in!
Knead the seasonings into the dough as evenly as possible. Then separate the dough into about 3 inch chunks. Stretch the dough out into a long tube and tie it into tight knots. These tight knots help create texture for the protein. If you skipped this step the wings would have a chicken nugget texture rather than a stringy texture that is found in wings.
At this point you’ll want to pan fry each of the knotted seitan wings. This helps create a skin for wings and also helps prevent the seitan from getting a spongy texture. It also adds a richness of flavor to the wings. Chicken has fat in it, and to make these bbq wings to taste more chicken like, you need to incorporate fat into the wings.
Simmering the Seitan
Either stuff the fried seitan wings into small muslin bags like this, or you can individually wrap them in cheese cloth. This will help prevent the wings from expanding so you have a firmer and meatier texture.
This recipe includes how to make a BBQ broth.
If you wanted, you could add a bottle of bbq sauce to water to create this broth instead.
I did the homemade broth to save money, so I didn’t have to buy multiple bottles of bbq sauce.
If using an Instant Pot slow cook the seitan in the broth on low. Think of this as not only slow cooking but marinating your seitan! The longer you slow cook these wings the better. Do it at least for 12 hours! There was once a time I forgot about my seitan and I left it to slow cook for three days- it was the best result I’ve ever had. Granted, letting your seitan rest for a day after the simmer will do a similar thing. Like muscle, gluten needs time to develop to become strong.
For the best result, let your seitan rest after the simmer. Bring it the refrigerator and bake it in BBQ the next day. If you aren’t patient and decide to bake them right away, you’ll still have delicious wings. But they will be soft!
Baking the Seitan
The day after you simmered your seitan its time to remove them from your muslin bags/cheesecloth. Give them another fry to really help develop their skin.
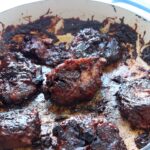
Then cover them with your favorite BBQ sauce and bake in the oven!
If you wanted, you could place the wings in foil, cover in bbq sauce, then put them on the grill. Do this at low heat for 1 hour so the sauce really cooks onto the wings.
Tips and Troubleshooting
Washing the flour can be an intimidating process for beginners!
Here is a video on some tips and tricks for helping with washing the flour!
Here are some other tips to help you have success
- Use cold water when washing the seitan
- Use a collander or seive to help collect any broken bits of seitan when pouring out the starch water
- Be gentle while washing the flour to prevent the gluten from breaking apart
- If it is really falling apart while washing, let it rest in cold water. This will help the protein seize up and make it easier to work with
- Use a high protein bread flour and not all purpose flour- it will make the process much easier
- When simmering, use a very low heat. The seitan needs a long slow cook. A higher temperature will result in the seitan expanding and developing bubbles, creating a spongy texture
Serving Suggestions
These wings are breathtaking on their own! My biggest regret is not making a double batch. They are also amazing inside of sliders, wraps, or even over a buddha bowl.
We’ve all had ‘vegan wings’, cauliflower wings, tofu wings- but these seitan wings are like the real deal! Think of this as vegan boneless bbq wings. Brands like Bocca, Gardien, Beyond, Quorn- are nothing compared to these wings. I haven’t found a single recipe with vital wheat gluten that comes close.
These wings are worth the time- especially if you want the best vegan bbq possible!
Looking for Other Vegan Meaty Recipes?
- This Washed Flour Seitan is just like chicken! This recipe creates one big seitan hunk that can be shredded, sliced, or torn into chunks! This is a staple recipe I use to make homemade tenders, chicken style lunch meat, or anytime I want a recipe that is chicken like!
- If you want something like roast beef- then this seitan recipe is for you! This is how to make flour washed roast beef. It’s full iron rich flavor makes it ideal for philly sandwiches and is amazing in gyros!
- If you are grilling and are looking for a vegan steak- look for further! This flour washed seitan steak is tender, meaty, and gives you a rib eye experience.
- Have you ever tried mushroom meat? Hen of the woods has a rich, meaty, yet buttery flavor- perfect for breading! These Kentucky Fried Hen of the Woods can easily be made gluten free and is a fantastic meaty side.
- This oyster mushroom bacon tastes so similar to bacon, it’s the perfect addition to your breakfast! Pink oyster mushrooms naturally have a bacon like flavor, then you coat them in a bacon sauce and fry them to perfection. Your BLTs will never be better!
BBQ Seitan Wings
Ingredients
Seitan Base
- 5 lbs Bread Flour
- 6-7 Cups Water
- 2 tbs Salt
Seitan Seasoning
- 2 tbs BBQ Seasoning
- 2 tbs Nutrional Yeast Flakes
- 1 tbs Mushroom Seasoning
To Fry
- ½ Cup Coconut Oil or avocado oil, sunflower oil, safflower oil, or canola oil
BBQ Broth
- 6 Cups Water
- 6 oz Tomato Paste 1 small can
- 1 Large Onion or about 1 cup
- ¼ cup Brown Sugar
- 4 tbs BBQ Seasoning
- 4 Cloves Garlic
- 2 tbs Malt Vinegar or balsamic vinager, or red wine vinager
- 2 tbs Mushroom Seasoning
- 2 tsp Smoked Paprika
BBQ Bake
Instructions
- Add the flour to a large bowl and mix in the water to create a dough, knead it to ensure there are no pockets of flour. Let rest for 1 hour
- Stretch and fold the dough over itself to help knead it. Do this until the dough is nice and smooth. Cover the dough in water and sprinkle over the saltLet rest overnight
- Pour away the salted water. Refill your bowl with cold water and gently knead it. The water will begin to become milky and thick with the starch that is separating from the dough. Pour away the white starch water to reserve for other recipes. Using a strainer can help with this process to prevent gluten from washing away. Continue to gently knead the dough under the cold water. Being gentle helps prevent the gluten from tearing so it is easier to work with. Continue to wash the dough until no more starch comes out of the dough- leaving you with clear water.
- Let the seitan rest for about 1 hour, this will help it firm up and be easier to work with. You'll notice it will leak out more water, pour that way
- Stretch out your seitan into a large rectangle and gently rub in the seasonings. Fold the dough over itself and continue to knead to incorporate the seasonings into the dough. You can let the dough rest again to firm up after this to make it easier to work with, but that is optional Roll your dough into a long log and break it up into about 3 to 4-inch sections. Stretch out each section and knot it up.
- Bring a frying pan up to medium heat and add about ¼ cup of coconut oil (or any neutral oil) – this is half of the oil this recipe calls for. Fry the knoted seitan until it has a gold brown exterior. Place each chunk of seitan inside of a small muslin bag or wrap each piece in cheesecloth.
- Slice up 1 onion and crush up at least 4 cloves of garlic. Add it to an Instant Pot or in a large stock pot over the stove. If using an Instant Pot set to sauté and add a little bit of oil to prevent sticking. If using a large stock pot then bring to medium high heat and add oil along with the onions and garlic. Sauté for about 10 minutes or until the onions are starting to become transluscent Then add the brown sugar, tomato paste, vinegar, mushroom seasoning, and smoked paprika. Let cook for a couple of minutes to let all the ingredients mingle.Add in the water and stir well.
- Add the wrapped seitan to the broth.If using an instant pot, set to slow cook on the lowest setting for 24 hours (it can be ready in 12 hours, but it will be very tender)If using a pot on the stove bring to a very low simmer, where there are little to no bubbles. Too high of a heat will cause the seitan to expand and will make it have bubbles- creating a spongy texture. Slow cook on the stove for 12 hours
- Remove the seitan from the broth and remove them from the muslin bags. For a firmer seitan, let it rest overnight. For a tender seitan skip the overnight rest and continue cooking
- Preheat your oven to 375F (190C)
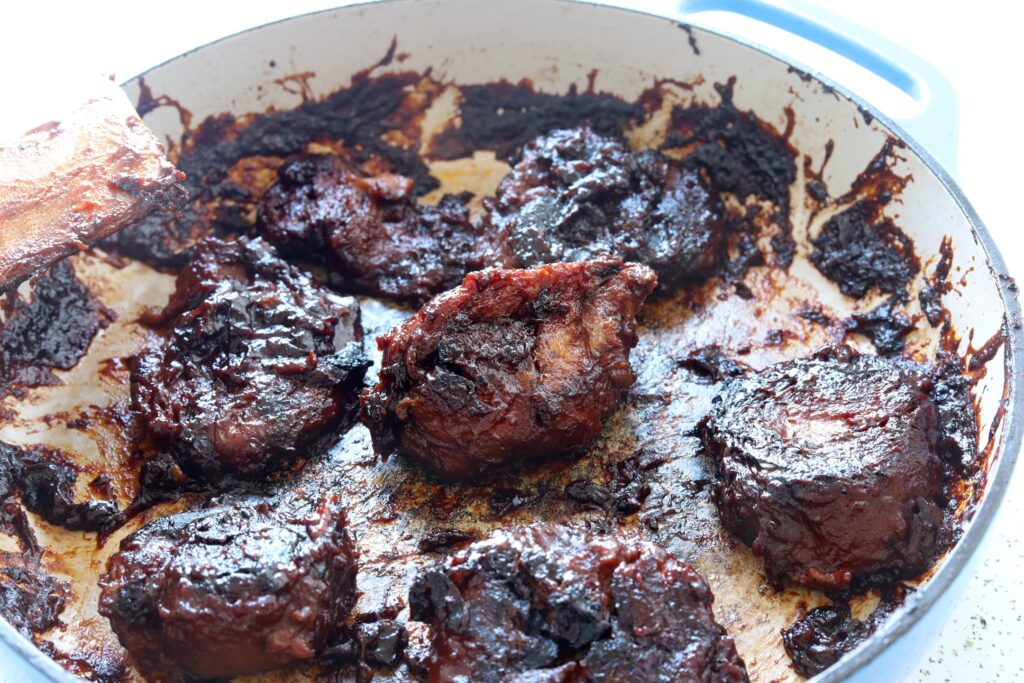
- Bring a cast iron pan to medium high heat and add ¼ cup of coconut oilFry the seitan for 4-6 minutes to crisp up the exterior.
- Remove from heatPour over the BBQ sauce over the seitan, ensure an even and thick coating
- Bake the seitan with a lid on in the oven for 45 minutesFlip the seitan and spoon over more BBQ sauce over each of themBake for another 20 minutes
- Allow the seitan to cool before serving
Video
Notes
- You can use all purpose flour instead of bread flour in this recipe- however you will have a smaller yield. All purpose flour is lower in protien and higher in starch, so you will have more washing to do to remove the starch from the dough.
- More resting time gives you a firmer seitan. After simmering the seitan for 24 hours it is recommended that you let it rest in the refrigerator for at least a few hours.
If you bake the seitan right after simmering you still get a flavorful seitan. However the texture of it is soft and tender. I found both ways to be delicious but the texture is more chicken like if you let the seitan rest.